Pages

Tuesday, January 31, 2012

Sneaking in Summer


The weather has been unseasonably warm this past week.  Warm enough where I have to remind myself it's January.  

This period of sunshine and warmth makes me crave summer vegetables.  I think this is a natural reaction to the winter.  Being deprived of the best of the summer bounty naturally makes you crave the bright rich flavors.  Sunday night we had a giant salad for dinner.  Loaded with mustard greens, tomatoes, and avocados.  I've also been picking up squash from the supermarket.  The great thing about squash is that as a "food group" it's always seasonal.  There are both summer squashes and winter squashes.  And I love them both. 

To celebrate the sunshine I did a switch from my typical winter squash (we've been doing a lot of pumpkin lately) to some yellow crooked-necks.  And then I topped them with some fresh herbs.  None of this is especially seasonal for January, but when it's warm outside, sometimes you do crazy things. 
Sauteed Squash and Herbs
1 Tbsp butter
1/2 lb squash (I used 2 crooked neck squash), sliced
1 Tbsp parsley, chopped
1 Tbsp basil, chopped
salt and pepper
  1. Melt the butter in a skillet.  Add the squash and cook 10 minutes, stirring and tossing so they are coated in butter.
  2. Sprinkle with the chopped herbs, salt and pepper to taste.

Monday, January 30, 2012

Race Report: Tinkerbell Half Marathon


It was almost exactly a year ago when I ran my last half marathon.   It was awful.  I was all of 2 minutes pregnant.  So recently pregnant, that we didn't even know it yet, but I had a sinking suspicion due to just how badly I ran that race. Well, that, and the fact that my breasts were having a hard time being contained by my bra.

I had planned to run the Safari Park Half Marathon during my first trimester.  I trained for it and everything.  But I held off on signing up, because I wasn't sure how I was going to feel.  I kept waiting for the morning sickness and fatigue that are the hallmarks of pregnancy.  Hallmarks that never showed up.  But by the time I realized that I was going to be able to run, it was sold out. 

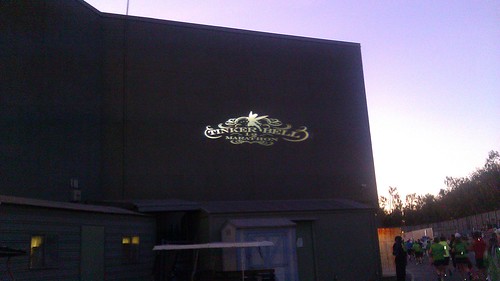
Shortly after I heard that Disneyland was introducing a new half marathon - the Tinkerbell Half Marathon.  I'm sure it was spurred on by the popularity of the Princess Half Marathon in Disney World.  A women-centric half.  I thought it would be the perfect way to make up for the horrible half and missing the Safari Park Half.  The only issue was that it was in January, 3 months after I was due to deliver.  Before I signed up, I talked to my Nurse Practitioner about whether I'd realistically be able to run.  She gave me the green light - assuming an uncomplicated delivery, she promised I'd be up and running within a couple weeks after giving birth.

So I signed up.  And made sure to keep up my running all through the pregnancy.  Even though it meant I got slower and had to decrease my milage to 2 miles a day because I couldn't fit in 3 miles before work in the morning.  I even ran the morning before I went to the hospital to bring Thatbaby into the world.  When it became clear I was going to be induced I told the nurse I'd like to avoid a C-section because it would pretty much mean no half marathon for me.

3 weeks after I gave birth I started training.  Running felt so good without the extra 20lbs and the additional lung capacity!  Even though most of my training had to be done on the treadmill after Thatboy got home from work.  But last week I realized that the training 3 weeks after giving birth wasn't what was going to make this half marathon tough.

You see, Thatbaby isn't especially developmentally advanced.  He's plodding along right where he should be, with the exception that he has decided to enter the 4 month wakeful period about 2 weeks early.  Up until last week he slept every night until around 6:30, waking up once to eat around 4am.  Last week he decided that schedule wasn't to his liking.  He added a feeding between midnight and 1:30am and moved that 4am feeding to 5:30.  Which took away my lovely 6 hour stretch of sleep. 

So on Sunday morning, I was awoken at 1:40am, 4 short hours after bedding down for the night.  I fed Thatbaby and managed to snag about 45 extra minutes of sleep before my alarm went off at 3am.  I got dressed and ready before waking Thatbaby to feed him again before we headed out.  

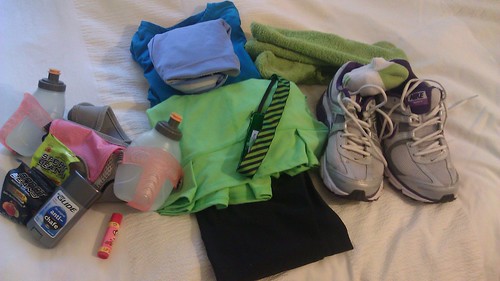
I am a walking endorsement of Nike.  Gotta love connections - thanks UDubb!

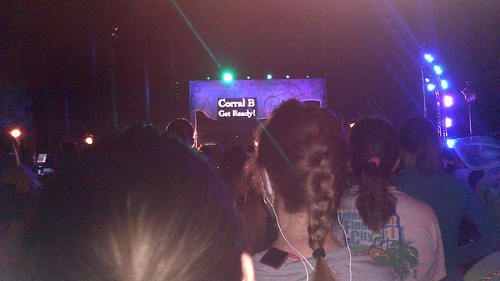
I found my way to my corral, which was packed with women of all ages and sizes.  Over 11,000 women were running and the excitement was palpable.  Lights, music, guest stars, even fireworks filled the air with energy.


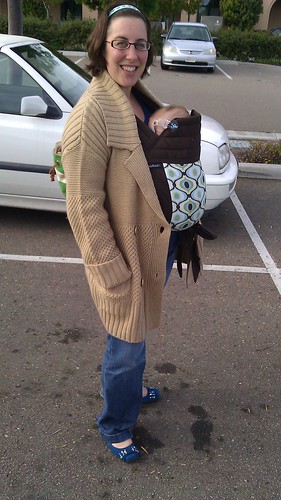
And if you want to get a lot of attention at a half marathon, bring your husband and not quite 4month old.  I made a lot of friends early on when people wanted to figure out what psycho would run a half marathon with a baby that tiny.


Real men wear their children.


It wasn't long before it was time to get going.


Minnie and Daisy started us off on the right foot (Get it?)


The race began and we were off.  I had turned my music on to Pandora's Disney station to keep up with the mood of the event.  Which was nice because songs like "Hakuna Matata" and "Spoonful of Sugar" were  definitely fun and inspiring.

Right away I noticed this was a different atmosphere than many of the races I'd done.  And I'm not just talking about the fairy wings and glitter.  Most of the time when I race I surge ahead - going out far too fast, far too soon because that's what everyone else does.  But this race everyone around me seemed to keep a really comfortable pace, and so I just stuck with it.

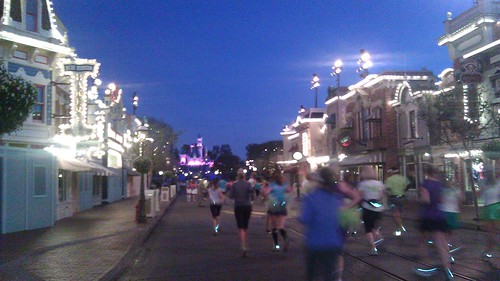
When the race starts at 5:45 in January, it's still dark.  Which meant Main Street was all lit up.


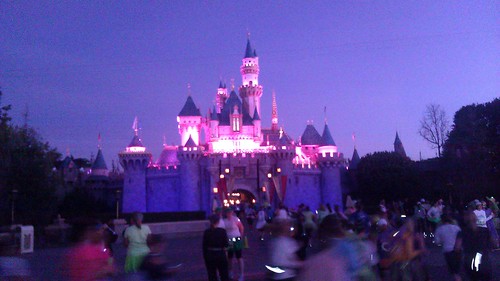
And so was Sleeping Beauty's castle.


The characters were out to play, the way they usually are during the Disney Races  - which makes for fun photo opportunities. 

The sun started coming out as we left the park.


And then we were on the streets of Anaheim.  Which was kind of boring.  I knew it would be.  The rest of the race went really really well.  The miles kind of flew by.  The first 4 were quick, like always.  I felt like I had just passed mile 7 when mile 8 popped up.  Usually around Mile 11 I start questioning my sanity.  I call it the 11 mile wall.  But around mile 11 I thought - wow, only 2 miles left? 

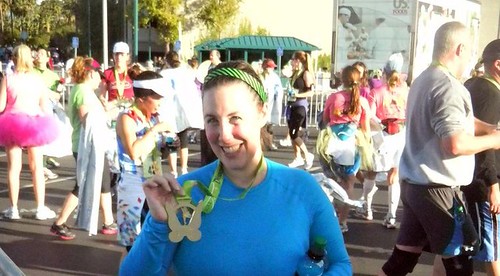
And then the finish line was directly in front of me. And then it was behind me!  I missed a PR by less than 2 minutes, which I attribute to three factors:
1) Stopping for photo ops in Disneyland.  I decided not to stop in California Adventure because I wanted to keep my good momentum going.
2) Starting off nice and comfortable instead of pushing too fast too early.
3) Staying nice and comfortable throughout the race.  

On the other hand -
1) I was 2 minutes faster than my last half last year.
2) I had negative splits!!!!!  I never have negative splits.  Probably because of that whole starting out too fast thing. 
3) I stayed nice and comfortable throughout the entire race.  Which felt good.  I never felt out of breath, never had rocks for legs, never was tired.  I never hit a wall.  In fact, my only complaint during the entire race was that I really needed to feed Thatbaby.  (Which I did as soon as the race was over - I had warned Thatboy before we even started that Thatbaby was going to need to eat when I finished whether he liked it or not.)
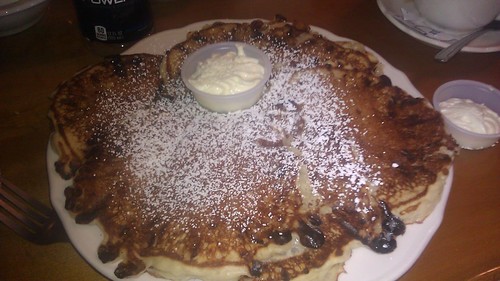
After the race we headed over to breakfast where I loaded up on cottage cheese pancakes!


Because every race should end with pancakes and powdered sugar.

Friday, January 27, 2012

All my bags are packed


Welp, it's here.  Training is over and this Sunday at 4:30am I'll be joining a bajillion other runners at the inaugural Tinkerbell Half Marathon at Disneyland.

This week has been prep-week.  I did my last long run on Sunday, cruising up to the beach and running along the coast.

10 miles doesn't seem so bad when this is beside you
Of course, when I had about 3 miles left I felt that old familiar twitch in my IT band.  Except it's switching things up a bit and it hit my right knee this time instead of my left.  Lots of foam rollering and wearing my vibrams for my taper runs this week and I've managed to successfully overcome any tightness or soreness.

I think the theory is to take the tapers slow and steady, but I hate running slowly on a treadmill.  I don't like running on a treadmill at all and this is the first half I've ever trained on a treadmill.  Which means my tapers this week have been closer to 5k speeds than half-marathon speeds.  It gets them over quickly and they're short anyway.

Since the race is at Disneyland, we're heading up to Thatmom's house as my base.  Which means I've also got everything packed up for the race since I won't be able to throw it together the night before. 


  • Hydration belt - to be filled with gatorade and water...which reminds me, I need to pack my gatorade.
  • Sport beans - for inside the hydration belt obvs.
  • body glide - to apply copiously before the race.
  • chapstick - for inside the hydration belt
  • therma-shirt with finger holes since I threw away my throwaway gloves and forgot to pick up new ones this winter
  • sports bra
  • tinkerbell-green running skirt
  • running tights - because I'm not sure the sun will be up by the time the race finishes
  • sweaty band - since this short hard doesn't pull up
  • leg warmers/arm warmers - for 4:30 corral lineup
  • socks
  • sneakers
And I've also been using the week as an excuse to carb load.  Thatmom is babysitting while Thatboy and I can have a night out to go to the new Italian restaurant in the area I've been looking forward to visiting.  And at home, I've been making sure to include pasta dishes on the menu.  But carb loading doesn't just mean piling on the pasta.  In order for carbohydrates to burn effectively, you need to give them plenty of protein.  So this dish, with pasta, sausage, and beans perfectly fits the bill.


Shells with Sausage, Beans, and Mascarpone (From Stirring the Pot)
1/2 lb pasta shells
2 Tbsp olive oil
2 links of chicken sausage, chopped
1/2 onion, chopped
1 clove garlic, minced
1/4 cup sherry
1 can cannellini beans, drained and rinsed
1 sprig oregano
1-2 teaspoons red pepper flakes
1 teaspoon Italian seasoning
1/2 cup mascarpone cheese
salt and pepper

  1. Bring a large pot of salted water to a boil over high heat. Add the pasta and cook until tender but still firm to the bite, stirring occasionally, about 8 to 10 minutes. Drain pasta reserving 1/2 cup of the cooking liquid.
  2. Heat olive oil over medium high heat and add the sausage and onions.  Cook until the onions are translucent (about 5 minutes).
  3. Add the garlic and cook 30 seconds, just until they become fragrant.
  4. Add the sherry, scraping up the browned pieces from the bottom of the pan.
  5. Add the beans, oregano, red pepper flakes and Italian seasoning and cook for 2 minutes.
  6. Add the reserved pasta water and mascarpone stirring until the cheese is dissolved.
  7. Season with salt and pepper to taste and toss with the hot pasta.

Thursday, January 26, 2012

Chipotle Re-do


I have a problem with leftovers.  Not leftover food, that always makes for some fantastic lunches.  But leftover ingredients.  When I only use half a can of beans the other half sits in my refrigerator where it gets forgotten about until it starts growing delicious white mold.  Yum!

Part of my New Year's resolution was to get better about that.  I've started taking those leftover ingredients and using them to create next week's meal plan.  Which is how this barbacoa came about.

Chipotles in adobo are one of my worst offenders when it comes to leftover ingredients.  Most recipes only call for one or two, and there are plenty more in the can.  Typically I freeze each chile in an ice cube tray.  Then I put the frozen chiles in a freezer bag aaaaaaaand forget about them for years and years and years.

So when I opened a can of chipotle chile peppers in adobe for the chipotle beef chili, I started looking for other uses for the chiles.  My search led me to a post on my cooking message board suggesting using them in Barbacoa Beef.  Unfortunately, the poster who suggested this was not a regular and appears to have posted one time only - suggesting this recipe.  So I'm not sure what the original source is.  

The idea of barbacoa instantly attracted me however for a couple of reasons.  The primary reason is that the barbacoa at Chipotle (the eatery, not the chile) is absolutely delicious.  And it seems a good omen that a Chipotle favorite would be utilized to use up chipotle.

Secondly, cooking giant pieces of meat means loads of the kind of leftovers I do like!

This recipe is FANTASTIC.  No really, it needs caps lock because it is just that good.  Spicy, sweet, tender, flavorful meat.  Thatboy and I fought over the leftovers - even though there were enough for days of lunches and provided him a great dinner when I went out with the girls.  We had it as tacos, burritos, sandwiches, and never got sick of it.  I have a feeling it's going to be making a regular appearance on the menu around these parts.


 Barbacoa Beef

3 lbs beef eye of round or bottom round roast, all fat trimmed, cut into 4 inch chunks
 5 cloves garlic
1/2 medium onion
juice of 1/2 lime
2-4 chipotles in adobo
1 tbsp ground cumin
1 tbsp ground oregano
1/2 tsp ground cloves
salt and pepper
3 bay leaves
1 tsp canola oil
1 cup water
  1. Puree garlic, onion, lime juice, cumin, oregano, chipotles, and cloves in a blender.
  2. Heat canola oil in dutch oven over medium high heat.  Season meat with salt and pepper and brown. 
  3. Add liquefied spices, water, bay leaves and simmer on low 4 hours, adding water as needed so that it doesn't dry out. 
  4. Remove the meat and place in a dish.  Shred it with two forks.
  5. Discard the bay leaf and return the shredded meat to the pot.  Simmer uncovered for about 10 minutes to let the flavors penetrate.

Wednesday, January 25, 2012

Catching up on Chili


If you've been reading this blog for any length of time you know I'm a chili fanatic.  I just can't get enough.  Especially in the fall/winter when the weather gets cold.  I've been lagging a little this year on my chili-ing, but partly that was because the weather had been so temperate.  Our typical December Downpours were practically non-existent.

And then January rolled around and the weather has gotten cold and wet.  Hello winter in Southern California!  And so I've been in chili overload.  (Is there really such a thing?)  Thatboy is ever so patient, but I know if I'm not careful he'll ask me to give it a rest.  (We haven't had ham in ages since it overstayed its welcome in Thathouse.)  So I've been good about only putting it on the menu one day a week.  Week after week.

And I've been switching up the chili quite a bit.  White chili, chicken chili, beef chili, turkey chili, with beans, without beans - Chili is one of those rare dishes that can be completely different from day to day.

I've been using some of my old favorite recipes, but I've also been blog-hopping to try new ones.  I should probably point out that my secret to perfect chili is using Muir Glen Fire Roasted Tomatoes with green chiles.  So any chili recipe that calls for tomatoes gets those.  Below you'll see two new-to-me recipes where I've tweaked the recipes a bit, including adding my favorite canned tomatoes.

The first new one I made is a slow-cooker chili.  I love the idea of using a slow-cooker to cook my chili so I can spend less time in the kitchen.  (Especially important when my weekday runs were amping up in mileage)  Plus we're big fans of the spice of Chipotle peppers.

My complaint about this chili is that it didn't have much of a sauce.  It was tender beef, beans, and tomatoes, but it wasn't very stew-y or chili-y.

Slow- Cooker Chipotle Beef Chili (adapted from The Dainty Chef)

1 can cannellini beans, drained and rinsed
1 can kidney beans, drained and rinsed
1 chipotle chile in adobo, finely chopped
1 can Muir Glen Fire Roasted Diced Tomatoes with Green Chiles
1 onion, finely chopped
1 green pepper, finely chopped
2 cloves garlic, minced
3 pounds beef chuck, cut into 1-inch chunks
1 Tbsp ground cumin
1 Sprig oregano
Salt and pepper

  1. Combine chipotle chili, a tsp of the adobo, tomatoes, onions, peppers, and garlic. 
  2. In another bowl combine beef, cumin, oregano, salt and pepper to taste.  
  3. Place half of the tomato mixture in the crockpot.  Place beef mixture on top, then beans, then the remaining tomato mixture.  Cook on high for 6 hours.

The next chili we tried was fantastic.  New favorite in Thathouse.  It's not a slow-cooker chili, but it comes together so very quickly that you won't even mind.  I've made turkey chili a number of times, but this was the first time I used black beans in a chili.  And they really work.  This was delicious the first night, but there was clearly not enough left over.  I'm warning you in advance so you can make more than I did.  Because I wanted more.


Turkey and Black Bean Chili from The Art of Living (as seen on Prevention RD)
1 Tbsp olive oil
1/2 large onion, chopped
1/2 green bell pepper, seeded and chopped
1/2 red bell pepper, seeded and chopped
2 garlic cloves, minced
1/2 lb ground skinless turkey
1 can black beans, rinsed and drained
1 can Muir Glen Fire Roasted Diced Tomatoes with Green Chiles
1/2  can tomato sauce
1 1/2 Tbsp chili powder
1/2 tsp Ancho chili powder
1/2 tsp Chipotle chili powder
3//4 Tbsp ground cumin
1 sprig oregano
  1.  Heat the oil in a large nonstick saucepan over medium-high heat. Add the onion, bell pepper, and garlic; cook, stirring occasionally, until softened, about 5 minutes.
  2. Add the turkey and cook, breaking it apart with a wooden spoon, until no longer pink, about 3 minutes. 
  3. Stir in the beans, tomatoes, tomato sauce, chili powder, cumin, oregano, and salt; bring to a boil. Reduce the heat and simmer, covered, until the vegetables are very tender, about 45 minutes.

And stay tuned because believe it or not, chili is on the menu for tomorrow night too!

Tuesday, January 24, 2012

Chips Ahoy

A couple of months ago my food processor went kaput.  I can't say it was entirely the fault of the food processor.  I might have been partially to blame by not checking the garbage disposal before turning it on.  

But let's not point any fingers.  

Luckily, since I've been such a good girl this year, I got this brand new shiny toy for Channukah.


It's got far more bells and whistles than my old food processor.  Including multiple slicing disks of varying sizes.  I've been putting off getting a mandoline for years because I am completely short on kitchen space.  This means that I have several things I'd like to make but just don't have the capability without something that can slice super thin.  Because we all know that sure as heck isn't one of my strong skills.

I'm in love love love with my new food processor.  Especially because it is whisper-quiet.  But I really love being able to use it to make things I've never dreamed of before.  Things that require paper thin slices of potatoes.  Because thick slices of potatoes just don't make potato chips.  They make french fries.  And when you're layering potatoes, thin slices work so much better so each bite has the appropriate proportion of potato, sauce, and cheese.

I made the potato chips on a night that Thatboy was going out to dinner with friends.  I wasn't smart enough to wait till after he left though and with each pass through the kitchen another couple of chips disappeared.  He seriously considered staying home.  Who would have thought the allure of sandwiches and chips for dinner would keep a man from his friends.

I learned from my mistake and made sure these scalloped potatoes were available on a night he was home for dinner.  And yet, served as a side, he didn't have room for them.  Figures, right?  Don't worry he made short work of them the next day for lunch.

Potato Chips 
2 russet potatoes
canola oil
salt
  1. Peel potatoes and slice them very thin.  This is where I used the thin slicing disk in my food processor.
  2. Soak the sliced potatoes in cold water for an hour.  Pat them with paper towels until they are very very dry.
  3. Heat several inches of oil in a pan until a candy thermometer indicates the oil is 390F.  Add the potatoes without crowding and fry, moving and turning them until they are golden brown.
  4. Lift out and drain on paper towels.  Toss with salt.
Scalloped Potatoes
3 russet potatoes
 2 Tbsp butter
2 Tbsp flour
1 cup hot milk
cayenne pepper
salt
1 egg yolk
1/4 cup shredded cheddar cheese
1/2 cup bread crumbs
  1.  Peel potatoes and boil until tender - about 20 minutes.  Slice the potatoes very thinly.  Hello new food processor!
  2. Melt butter in a skillet over low heat.  Stir in the flour until a paste forms and starts to bubble.  Slowly pour in the milk and stir until the sauce thickens.
  3. Stir in the cayenne and salt to taste, the egg yolk, and the cheddar.  Keep stirring until the cheese has completely melted.
  4. Spread a thin layer of the sauce over the bottom of a casserole dish.  Place a layer of potatoes on top of the sauce.  Continue alternating sauce and potatoes, finishing with the sauce.
  5. Sprinkle the bread crumbs on top and bake for 25 minutes.

Monday, January 23, 2012

All grown up


This holiday season Thatboy, Thatbaby and I were very generously gifted giftcards to some of our favorite stores.  We decided to use this weekend as a fun "shopping spree" trip for the three of us to pick some things up.

I needed some things for my typical "mommy uniform."  I find that since having Thatbaby I tend to wear the same general thing every day. I wear all my old clothes - just your typical tops and bottoms.  But when I'm cold I have to top it with something that opens in the front - either a sweatshirt, jacket, or sweater that buttons or zips.  There are two reasons for this - the first is convenience for nursing. But more importantly, I wear Thatbaby a lot.  Pretty much every time we go out.  I'm not a big fan of strollers because they're hard to maneuver in stores and take up way to much room in aisles. 

So for the holidays I had asked for big chunky sweaters that I could wear with our carriers.  Large enough to close over the carrier for colder days to help keep little legs warm.  I didn't get any, but the gift cards were an easy way to fix that. 

This is obviously not me.  But it is the sweater I got.

In addition to the sweater, I wanted to pick up a new pair of flats since I'm wearing mine to death.  I'm usually a heels girl - I can use all the height I can get.  But flats are super easy to slip on and off when I want to tuck my feet up underneath me.  And they work equally well with my regular jeans, skinny jeans, and jersey skirts.
Both worked fabulously in action when we went to meet some friends for lunch.  The sweater is roomy enough for me to button it right over Thatbaby.


Earlier this week Valli claimed that cheesecake was very "80's."   Maybe it's because I wasn't around in the 70s, but for me, cheesecake is timeless.  But it also always seemed very grown up when I was a kid.  I mean, it's a cake with no frosting!  And it's made out of cheese - which doesn't sound like something very cake-like.  But I am, in fact, a grownup.  So I can obviously appreciate a good cheesecake.  My biggest problem with cheesecake however is the size.  A cheesecake in our house seems to last forever.  It's almost magical.  No matter how many slices you cut, there's always a ton left.  I decided to change around a cheesecake recipe to make a smaller, cheese-cake pie.  It's everything you love about cheesecake, just less.  Which means it disappears much faster.  And I made it chocolate because I'm not that grownup. 

Chocolate Cheesecake Pie
1 1/2 cups graham cracker crumbs (about 6 ounces)
1/4 cup sugar
1/2 cup melted unsalted butter
8oz cream cheese
1/2 cup sugar + 1 Tbsp
1/4 cup cocoa
1 tsp vanilla
1 egg
1/2 cup sour cream
  1. Preheat oven to 375.  Mix the graham crackers with sugar and melted butter and press into the bottom and sides of 9 inch pie pan.  Chill while preparing filling.
  2. In an electric mixer, cream cream cheese.  
  3. Add in 1/2 cup sugar and beat until light and fluffy.
  4. Add in cocoa, 1/2 tsp vanilla, and egg.  Beat until thoroughly combined.  
  5. Pour into prepared crust.  Bake for 20 minutes.  Let cool for 20 minutes.  
  6. While cooling preheat the oven to 425.  Stir together the sour cream, remaining sugar and vanilla.  Spread over the cooled pie and bake for 10 minutes.

Friday, January 20, 2012

The Mexican Test


While we were in Palm Desert for New Years the "check engine" light went on in my car.  Makes sense, it'd been a full 2 weeks since something was wrong with one of our cars.  We brought it in for repair, which happened to be in a part of town near where I worked several years ago.  While we waited to pick up my car I dragged Thatboy over to my old lunch spot.  
If there's one thing San Diego is not lacking in, it's Mexican restaurants.  But not all restaurants are created equal.  Inevitably it's the little hole in the walls that are the best.  This one doesn't even have a name on the outside.  But it's delicious.  As I got my typical pastor burrito, Thatboy ordered the chicken enchiladas.

"Enchiladas?  Really?  I'm surprised."  Which is when he informed me that he always orders enchiladas at a new Mexican place - to test and see if the place is any good.  It's amazing that after almost 12 years you can still learn something new about someone.  

Personally, I think that's a weird test food.  Firstly, because enchiladas aren't all that difficult a dish to prepare.  Secondly (and this is related to the first), I can make enchiladas at home.  And I do.  All you have to do is make a sauce, toss together a filling, roll, and pour.  And now that I have an all time favorite sauce, making enchiladas are even easier (and tastier).  To switch it up from the chicken we recently had, I made these enchiladas vegetarian.  Mashed black beans need little accoutrement other than heating.

It's hard to mess up enchiladas - but you go ahead and test out this theory yourself.


Black Bean Enchiladas
2 medium onions, chopped fine
2 jalapenos, seeded and chopped fine
2 tsp canola oil
6 medium cloves garlic, minced
3 Tbsp chili powder
2 tsp ground cumin
3 tsp sugar
1 15-oz can tomato sauce
1 cup water
1 large beefsteak tomato, seeded and chopped
1 can black beans, drained, rinsed and mashed
½ cup minced fresh cilantro
¼ can diced green chiles
Salt and pepper
12 corn tortillas
1 cup shredded cheddar cheese
  1. Preheat oven to 450. Combine half the onion, jalapeno, and half the oil in a large saucepan.
  2. Cover and cook over medium-low heat, stirring often, until the onions and peppers have softened, 8-10 minutes.
  3. Stir in half the garlic, chili powder, cumin, and sugar, and cook until fragrant, less than 30 seconds.
  4. Stir in the tomato sauce, water, and chopped tomato. Bring to a simmer, and cook until slightly thickened, 5 minutes.
  5. Strain the sauce through a strainer into a medium bowl, pressing the onion mixture to extract as much liquid as possible.
  6. Heat remaining oil to a large skillet. Add the remaining onion and cook until translucent.
  7. Stir in the remaining garlic and cook just until fragrant, about 30 seconds.
  8. Stir in the black beans and cook until warmed through.
  9. Remove from heat and stir in 1/2 cup of the sauce, cilantro, and canned chiles.
  10. Heat the corn tortillas until pliable (I use the burners on my gas stove for this - gives them a nice char too!)
  11. Divide filling between the tortillas, roll, and place in a 9x13 baking dish.
  12. Pour remaining sauce over the enchiladas and sprinkle with cheese. Cover and bake 2o minutes.
  13. Remove cover and bake an additional 5 minutes until cheese is bubbly.

Thursday, January 19, 2012

Creamy Potatoes


You might have noticed I've been doing a lot of cooking with potatoes lately.  It's a winter thing for me.  In terms of seasonal produce, potatoes are just about as seasonal as it comes.  Potatoes spend all summer growing and storing up starch, getting as fat as a bear preparing for hibernation.  This growing and storing of starch makes them especially filling when the days are cold and the nights are long.

I love potatoes for thickening soup and stews.  But where I come from, they are a pretty typical side dish.  Thatboy grew up with rice as a side dish for most meals, but we always had baked potatoes, or stuffed potatoes, or oven fries.  

This is a combination of those two things.  These skillet potatoes use the potato's natural starch to create a creamy sauce, thickening the beef broth.  It makes the perfect side, a nice change from your typical oven-cooked potato.  And dicing the potato makes it cook fast enough for a weeknight.  Gotta love surface area to volume ratios.


Creamy Diced Potatoes
1 Tbsp butter
1/2 onion, chopped
3 Yukon gold potatoes, diced
1/4 cup beef broth
salt and pepper
  1. Melt the butter in a pan over medium heat. Cook the onion until translucent.
  2. Add the potatoes and mix well.
  3. Stir in the beef broth and bring to a boil. Lower heat and simmer, covered for 10-20 minutes, until the potatoes are fork tendered.
  4. Season with salt and pepper.

Wednesday, January 18, 2012

Penne Arrabbi-vodka


I love spicy pasta.  Well, I like spicy food in general, but I especially like spicy pasta.  One of my favorites is arrabbiata sauce.  Arrabbiata is Italian for angry, which is one of my favorite parts of the sauce.  I mean, who doesn't like angry pasta?

The traditional arrabiata sauce is basically tomato, garlic, and red chili pepper cooked in olive oil.  Which is easy.  So easy in fact that I wanted to spice it up a bit.  I decided to improve on an old favorite by playing around with the ingredients.  I decided to make a vodka-arrabiata sauce.  But I've never made a vodka sauce before.  And while searching for a good recipe, I ran across Mary's vodka cream sauce.  I thought the cream would serve as a nice counterpart to the spicy red chili pepper of the arrabbiata sauce.  I did reduce the amount of cream though - it's not the primary aspect of this dish and you don't need a lot to make the sauce creamy. 

The result is an impossibly creamy, spicy sauce.  It's pasta with a kick.  I made it with penne, but in the future I think penne rigate, or even rigatoni would be a better choice as the ridges would catch and hold the sauce a little better.  Although, as you can see, this makes a nice, thick chunky sauce which seems to cling pretty well.


Penne Arrabbi-vodka
1/2 box of penne pasta
1 Tbsp olive oil
1/2 onion, chopped
1 clove of garlic, minced
1 tsp crushed red pepper flakes
1 sprig oregano
1/3 cup vodka
1 can peeled plum tomatoes, drained
salt and pepper
1/2 cup heavy cream

  1. Cook the penne according to directions on box. Preheat oven to 375. Heat the oil in an oven proof pan. Cook the onions until translucent.
  2. Add the garlic, red pepper, oregano, and cook just until fragrant - 30 seconds.
  3. Add the vodka and bring to a boil. Lower heat and simmer 20 minutes.
  4. Add in the tomatoes, salt and pepper to taste. Cover and place in the oven for 45 minutes. Let cool.
  5. Puree the tomato mixture until smooth and return to the pan, reheat. Add the cream and stir.
  6. Toss the pasta with the sauce and cook until heated through.

Tuesday, January 17, 2012

Ready for another cake?


As you may or may not have noticed, this blog has been inundated with sweet recipes.  3 cakes in one month?  Pretty unusual for a girl who claims to be more into savory than sweet.  But the holidays are a time when we all overindulge.  

Now that it's January there are far fewer baked goods in Thathouse.  There's a chocolate chip banana bread in the fridge Thatmom brought up last week, but other than that, nada.  Now we go back to the savory and the only cakes you'll find round these parts are the occasional pancake.  (Although to be fair, I haven't made pancakes in ages.)

But savory cakes I can definitely get behind.  They make great side dishes.  Technically this could be considered a baked mashed potato dish, because really, that's all that is.  Mashed potatoes, formed into a cake, and then baked until brown.  The eggs serve two purposes - the yolks act as a nice binder, and the whites, folded in, give it some rise.  Then you can cut it into slices and serve it just like a cake.  Without the frosting of course. 


Potato Cake
2 baked potatoes
1 Tbsp butter
1 1/2 Tbsp heavy cream
1 egg separated
salt and pepper
  1. Preheat oven to 375. Scoop out the inside of the baked potato.
  2. Add the butter, cream, egg yolk, salt and pepper to the baked potato guts and beat until smooth.
  3. Beat the egg white until stiff.
  4. Heat the potato mixture over medium heat, gradually mixing in the egg white.
  5. Form the potato mixture into a loafish shape. Place on a baking sheet and bake 10-12 minutes until browned.

Monday, January 16, 2012

As A Dog


2 weeks ago I got some sort of 24 hour virus.  It was a head cold, combined with a fever and chills.  As almost anyone will tell you, the surefire cure for being sick as a dog is warm, comforting, soup.  Which is only fitting, because Branny is once again hosting her Souper Bowl.

It's fitting for two reasons.  The first has to do with the whole "sick as a dog" part because the Souper Bowl follows Branny's commitment to animals.  Her home is overrun with dogs, horses, and a cat.  Her heart is overrrun with kindness.  Put the two together and this is a charity event that couldn't fit her any better.  

The second reason me being sick fits the Souper Bowl is because of the whole "soup" thing.  For every blogger who enters a soup post, Branny is donating $1.00 to the ASPCA.  And we've been doing quite a bit of soup lately.  Hey, it's winter, even if it is California.  I thought I would round them all up into one post, plus they kind of lead into each other.

As I did last year, I'm dedicating this entry to Thatdog, because he's put up with a lot this past month.  What a trooper.  He's such a good big brother and doesn't seem to mind too much that we've completely disrupted his life with a loud, little, screaming thing.

And there's still time for you to enter - You have until January 31st if you'd like to enter some soup of your own!

We'll start with Channukah.  I left this off the menu so I could include it here.  Flipping through my holiday cookbook I found a "vegetable meat soup."  Which is kind of a funny name when you think about it.  I mean, I get vegetable soup, and I get beef soup, but the need to include both in the title would lead one to believe those are the only ingredients.  Really though, this is a fantastic beef and barley soup, loaded with typical soup vegetables like carrots and celery, but also mushrooms, barley, beans, and peas.  It's loaded with just about everything.  It was my favorite part of the meal.


Russian Vegetable Meat Soup (From Joan Nathan's Jewish Holiday Cookbook)
3 carrots
2 potatoes
1 sweet potato
4 quarts water
2 lbs top rib, cut in 1 inch chunks
2 oz dried mushrooms or 1 cup sliced mushrooms
1/2 cup dried lima beans
1/2 cup dried green split peas
1/2 cup barley
1/2 lb string beans, diced
4 ribs celery, diced
salt and pepper

  1. Grate the carrots, potatoes, and sweet potatoes.
  2. Bring the water to a boil and add all the ingredients. Cover and simmer 2 hours, stirring occasionally.

In fact, I liked it so much that I adapted it into a vegetarian version - a "vegetable soup" if you will.  I added some extra mushrooms after I found a "Monterey Mix" at the store which had some of my favorite mushroom varieties.  And I left out the potatoes which were no more than a thickening agent so it could be a little brothier and added garlic which I felt were missing from the first version.  I'm a fan of barley soups in general, and this one is nice and not too heavy.


Russian Vegetable Soup
1 carrot, diced
5 cups vegetable broth
2 oz dried mushrooms (I used a mushroom mix which included porcini, oyster, shitake, and morels)
1 cup sliced cremini mushrooms
1/2 cup barley
1 rib celery, diced
2 cloves garlic, minced
salt and pepper

  1. Bring the vegetable broth to a boil. Add all the ingredients.
  2. Cover and simmer 40 minutes or until the barley is tender.


As I mentioned, I made baked potatoes for our New Year's Eve feast.  And we had leftovers.  What do YOU do with leftover baked potatoes?  I make soup.  Especially in the winter.  Potato soup is ridiculously easy if you already have baked potatoes.  All you have to do is mash them and add a nice roux.  The potatoes make it thick, the roux makes it even thicker and creamier.  So much so that you don't even have to use cream - I make mine with skim milk.  Which is nice, because then I don't feel so guilty about loading in the cheese!


Baked Potato Soup
2 baked potatoes
2 Tbsp butter
2 Tbsp flour
3 cups hot milk
1 cup cheddar cheese, shredded
salt and pepper
  1. Scoop out the insides of the baked potatoes and mash with the back of a fork or a potato ricer, or whatever you use to make mashed potatoes. Make them as smooth or chunky as you like.
  2. Melt the butter in a pot. Gradually whisk in the flour until a paste forms. Cook for a minute or two until bubbly.
  3. Gradually whisk in the hot milk. Cook until the milk thickens.
  4. Add the potatoes, cheddar and salt and pepper to taste. Heat until cooked through.


And this is the soup that should be the star of this post.  Only because this is the soup I made when I was sick and needed to get better quickly.  Once again I used potatoes to thicken this soup so I didn't have to use cream, just vegetable broth.  Although, with the addition of the vegetable broth, the potatoes, and the celery maybe I should call it "Artichoke and vegetable" soup?


Artichoke Soup
1 Tbsp. canola oil
1 potato, peeled and sliced
3 Tbsp onion, sliced
1 rib of celery, diced
1 can artichoke hearts, drained
1 clove garlic, minced
3 cups vegetable broth
1 Tbsp parsley, minced
1 sprig oregano
1 Tbsp basil, chiffonade
salt and pepper
  1. Heat oil in skillet over medium heat. Add potatoes, onion, and celery and cook until the potatoes are fork tender. Let cool.
  2. Place cooled potatoes, onion, celery, artichokes and garlic in a food processor and pulse until the mixture is smooth.
  3. Place the mixture in a pot. Add vegetable broth, parsley, oregano, and basil. Bring to a boil. Cover, lower heat, and simmer 20 minutes. Season with salt and pepper to taste.

Friday, January 13, 2012

Kitchen Helper


This year for New Year's Eve we headed out of town. Thatmom had suggested a family trip to our timeshare in Palm Desert. Since it was just a quick couple of hours away, we thought it would be a safe first vacation with new baby in tow.

A couple of days before we were to leave, I received this email from Thatmom:

Hello my loved ones,

Next weekend we are dining at Zins in palm springs for dinner on Friday eve, then having breakfast at Cheeky's the next day. On New Years eve, we will cook indoors at the Time Share and if okay with you, I have assignments for dinner.

Thatbrother will do the appetizer (caprese is fine)
UDubb will do a small salad
Thatboy will pick out the wine
Thatgirl will prepare the filet mignon
Thatmom will do the side dishes
Thatbaby will do the desert.

Everyone had a job to do. And it worked out really well for the most part. I ended up making some baked potatoes to go with the filets, and UDubb and Thatbrother ended up bringing the wine. Really Thatboy was the only one who got out of doing anything. Even Thatbaby got in on the action, taking his duty of dessert very seriously.


Because my mocha walnut cake had been such a hit, he thought he should try a Fannie Farmer cake also. He chose a velvet cake - so called because of "velvet texture." The recipe was unlike anything I'd ever seen. It called for 1/2 a cup of cornstarch and 4 tsp of baking powder. And it called for beating the egg whites until stiff before folding them into the batter. I figured the cake would probably float away! Or explode.


I'll have to do some Alton Brown research on those ingredients, but I can tell you that they made this cake perfectly light, crumbly, and buttery. (Well the butter probably made it buttery.) With a simple boiled chocolate frosting, this cake is classic and simple, but a sure fire winner. Thatboy thinks it's the best homemade cake he's ever had. Which I'm sure is partly due to Thatbaby's loving hand in it's creation.

One tip - on New Year's Eve we cut the cake cold from the fridge. It was alright. It wasn't until the next night when we took it out of the fridge and let it come to room temperature that it really shone. So make sure you let it come to room temp before serving.


Velvet Cake (From the Fannie Farmer Cookbook)
1/4 lb butter
1 cup sugar
4 eggs, separated
1 1/2 cups cake flour
1/2 cup cornstarch
1/2 tsp salt
4 tsp baking powder
  1. Preheat oven to 350. Spray 2 8-inch cake pans with baking spray. Cream the butter in an electric mixture.
  2. Add the sugar and beat until light and fluffy.
  3. Beat in the egg yolks, one at a time.
  4. Beat in 1/2 cup of cold water.
  5. In a separate bowl, combine the flour, cornstarch, salt, and baking powder. Add the dry ingredients to the wet ingredients in stages and mix thoroughly.
  6. Beat the egg whites until stiff, but not dry. Stir a third of the whites into the batter.
  7. Fold in the remaining whites and spread the batter into the pans. Bake for about 25 minutes. Coll in pans for 5 minutes before turning onto racks. Cool completely before frosting.
Chocolate Butter Frosting
1/2 cup sugar
1 egg yolk
1/4 lb butter
4 oz semi-sweet chocolate, melted
  1. Boil the sugar and 1/4 cup water until the mixture reaches 240 degrees F.
  2. While the sugar syrup is cooking, beat the egg yolk well. Pour the syrup over the egg, beating constantly.
  3. Beat in the butter until it's incorporated.
  4. Mix in the melted chocolate and continue to beat until the frosting is of spreading consistency.

Thursday, January 12, 2012

Day Drinkin' - Must be nice

Thatboy took off the week between Christmas and New Years. We decided this would be an excellent time to make the trip out to Temecula to our wine club. Mostly because we are completely out of wine. Some chick who lives in this house seems to be off her 9-month sobriety wagon.

We joined the wine club at Churon Winery for a couple of reasons:
1) We really like the wines.
2) It's only 2 wines every other month.
3) They don't send you random wine. Every other month you can go and pick out whatever 2 you like.
4) You don't have to go pick up every month, they'll hold your wine for you until you do go pick it up.

Since we hadn't been to Churon since May, we had 8 bottles to pick up. As members we get free tastings, so we took advantage to see if there was anything new we wanted to add to our usual suspects.

We packed up a cooler with cheese and crackers, packed up the dog and baby, and headed out.

We sat outside and enjoyed the day and our little picnic. We also got to try an unreleased late harvest tempranillo. Which was amazing. I can't wait to get a bottle at our next pick-up. Thatbaby can't wait either:


Don't worry - he wasn't driving.

We picked up a healthy dose of reds, including Thatboy's favorite port, and a couple of whites, including the new pinot grigio. So far the first bottle we've opened is the Ruby Cabernet, which is a fairly typical Cabernet. Cabs aren't generally our favorite, but we like the tobacco-iness of this one. And it pairs well with a nice heavy winter pasta dish. Like one of my favorite stroganoff recipes.


I like this dish because it's a true one pot meal - the noodles cook in the sauce/broth so you don't even need to dirty a boiling pot. If you find some nice meaty mushrooms, each bite fills your mouth with good, rich flavor.

Wednesday, January 11, 2012

Christmas at Home


Every year Christmas is a huge, disappointing ordeal. We take time off work and head up to the inlaws where we sit and contemplate our navels for days on end. Everyone there is miserable and they spend the entire time we're there trying to get us to be as miserable as they are. And then the following week Thatboy tries to convince me that if we just moved closer, we could help everyone be less miserable. Which means I get to spend a miserable time there and look forward to some more misery when we get home.

One of the reasons I was aiming for an October baby was because Thatboy agreed with me that if we had a baby in October, there was no way we could trek up to his parents for the holidays. Not with a new baby! We broke the news to the inlaws when we went up for Easter and invited them to come down and spend Thatbaby's first Christmas with us. Even though they TMIL already taken time off work, that week, they declined. They didn't want to come down and see us.

As Christmas approached, Thatboy get more and more glum. He was sad about not going home, sad about not seeing his family. And I spent more and more energy into trying to make the holidays special for him.

Well, not just him. I wanted it to be special for Thatbaby too. A couple years ago I had made a stocking for a friend's baby. And I knew that I wanted to make one for Thatbaby too. I should have started it in November, but I didn't. All of a sudden it was December and I realized that I should probably get on it. Thatboy's grandmother had made him a green stocking with red trim, so he requested Thatbaby's be similar.

After a couple days of nonstop work it was complete!


(The other side has his name embroidered onto it)

Thatmom joined us for both Christmas Eve and Christmas Day. Which meant she got some good baby holding time while we did fun things like make gingerbread houses.

(I think this is the best one we've ever made)


I let Thatboy pick out whatever he wanted for Christmas Eve dinner. The menu was rack of lamb, roasted broccoli and wild rice. And then the night before I realized I hadn't planned anything for dessert. Luckily, Channukah came before Christmas this year and one of my Channukah presents from Thatmom was Maida Heatter's Cakes. Growing up, Maida Heatter was who Thatmom turned to for desserts - literally. She actually wrote to Maida Heatter. This was, of course, before the internet and blogs where one can pose a quick question to a great baker. I felt sure that we could find an amazing dessert from the book. Thatboy picked out the Farmer's Daughter Cake - a classic: white cake with chocolate frosting. What makes the cake less classic is the fact that it is made without any butter/shortening/oil at all. All the fat content in this cake come from cream, which is why Maida dubs it the Farmer's Daughter cake - surmising that it was probably made on a dairy farm.

The frosting is thick and fudgey, a complement to the sort of plain cake below. While this cake probably would have gone over okay, since it was paired with the mocha walnut cake, it was definitely overshadowed.


Farmer's Daughter Cake (From Maida Heatter's Cakes)
2 eggs
1 tsp. vanilla
1/4 tsp. almond extract
2 tsp. baking powder
1/4 tsp. salt
1 cup sugar
1 cup heavy cream
2 cups flour

  1. Heat the oven to 350. Spray an 8x8 pan with baking spray. Beat the eggs in an electric mixer.
  2. Add the vanilla, almond extract, baking powder and salt.
  3. Beat in the sugar.
  4. Add the cream.
  5. Lower the speed and add the flour, mixing until smooth. Pour the batter into the pan and bake for 35-40 minutes. Cool for 5 minutes, run a sharp knife around the sides and cool another five minutes. Turn out onto a rack and cool completely before frosting.

Classic Chocolate Frosting
4 oz. unsweetened chocolate
1/2 cup milk
1 1/3 cup sugar
2 egg yolks
1 TBSP + 1 tsp. butter
1 tsp. vanilla

  1. In a small saucepan over medium heat, melt the chocolate with the milk and sugar. Remove from the heat and let stand for a minute.
  2. Beat the egg yolks a bit and temper it by adding half of the chocolate mixture.
  3. Pour the egg yolks back into the chocolate. Return to low heat and cook, stirring, for one minute.
  4. Stir in the butter and vanilla. Let cool to room temperature.
  5. Beat the cooled frosting for 10-15 minutes until it becomes thick and spreadable.
  6. Here comes the "pro tip part." Maida recommends pouring half of the frosting over the top of the cake and letting it cool a bit. Then pour the rest of it over. This way, she says, it won't go crazy running over the sides and pooling at the bottom.