Pages

Showing posts with label Passover. Show all posts

Wednesday, April 08, 2020

Passover Prep: Stuffed Matzah Balls


Most of us have had to make changes to our upcoming holiday plans and we're no different.  So instead of heading up to our big family seder tonight, we're doing it virtually.  So a lot less travel, but also - that means I need to make dinner!  You win some, you lose some.

In addition to those kind of changes, I think a lot of us are rethinking and simplifying our menus.  Because I'm still working full time, with no reprieve from momm-ing since there's no school, so the idea of making the typical multi-course seder just doesn't seem doable.

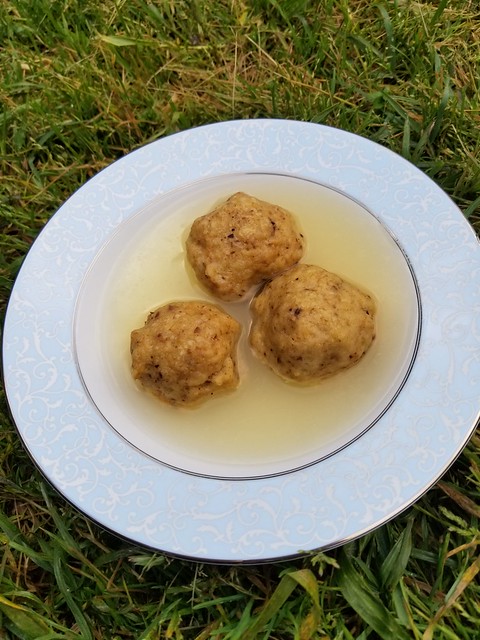
Instead I've decided to focus on the seder food my family loves - matzah ball soup.  It's my kids' favorite, and usually they don't eat much else.  So why not just make it the star of the show?  I found a recipe for "South African- Lithuanian Stuffed Kneydlakh" in my Joan Nathan Holiday cookbook and it seemed like the most perfect idea - matzah balls stuffed with meat.  It takes the dish from an appetizer to a main course.

And then I tried to make them.

I knew they didn't look right as soon as I added the matzah meal.  It was supposed to look like "a soft mass" but there was absolutely no massing.  Just a lot of water with some matzah meal floating around.  I forged ahead.  Maybe it REALLY firms up in the refrigerator.

They didn't.

"No problem," I thought, pressing on, maybe the magic is in the boiling.  And I gamely tried to shape the mush around the filling.

Friends, the magic was not in the boiling.  I ended up with little meatballs floating in water with matzah meal just...everywhere.

But I had the basic idea, so I decided to toss the recipe and just do it myself.  And THAT is where the magic happened.  With one hand in the mixture, I added the ingredients in my own order - with the water last, adding just enough to create a dough that was slightly wet, but still held together.

With a dough already holding its shape, I didn't need to refrigerate it as long - just until my water boiled.  And then it was so easy to shape the balls around the filling.  They held their shape while they boiled, and turned a beautiful brown when roasted in the oven.

And how did they taste you ask?  Well let me just say my family is not going to be missing a main course brisket this year!

Stuffed Matzah Balls
1/4 lb ground meat (beef/chicken/turkey)
1 Tbsp canola oil
2 eggs yolks
4 1/2 Tbsp margarine
1 1/2 cups + 2 Tbsp matzah meal
1/4 tsp cinnamon
2 eggs
  1. Heat the oil in a pan over medium high heat.  Add ground meat and cook until browned.  Drain and cool.
  2. Add egg yolks, 2 Tbsp margarine, 2 Tbsp matzah meal, a pinch of salt, and cinnamon.  Refrigerate an hour.
  3. Combine eggs, 1 1/2 Tbsp margarine, matzah meal, and a tsp of salt in a large bowl.
  4. Slowly add water until the mix turns into a dough that's wet, but still sticks together  (this was just scant of a cup for me).  Place in refrigerator.
  5. Bring 3 quarts salted water to a boil.  When water is boiling, divide the matzah meal into 8-10 balls.
  6. Place 1 tsp of filling in the middle of each ball, and enclose in the ball by pinching the edges over the filling. 
  7. Place the filled matzah balls in the boiling water.  Cover and simmer for 20 minutes. Preheat the oven to 400 while the matzah balls cook.
  8. Drain the matzah balls and place on a pan.  Divide the remaining margarine between the tops of the balls and bake for about 15 minutes. 
Wednesday, April 01, 2020

Passover Friendly Easter Brunch: Tira-matz-su


This is it.  This is the going to be the centerpiece of your Easter Brunch.  Or Passover Seder.  Or just your Passover in general. 

Tiramisu is my all time favorite dessert.  And I make it the classic way so it's very labor intensive and rarely gets made at all.  So when I read about a matzah tiramisu last year, I was ALL IN.

The idea is simple enough - I mean, I make matzah lasagna, and what is tiramisu but a dessert lasagna?


I did need to make a slight alternation to make it work though, a simple cocoa dusting on top wasn't going to work with matzah.  It needed something a little more wet.  A ganache works pretty well for that though.

My favorite taste tester thought it was amazing and wanted me to make enough for before, during, and after Passover.  I'm sure the rum didn't hurt.


Tira-matz-su
1 1/2 cups strong coffee, cooled
1 Tbsp + 1/2 tsp dark rum
1/3 cup + 1 Tbsp sugar
1 1/2 cups heavy cream
1/2 cup mascarpone
3 large egg yolks
4 sheets of matzah
cocoa powder
2 oz bittersweet chocolate
  1. Whisk coffee, 1 Tbsp rum, a pinch of salt and 1 Tbsp sugar in a shallow dish large enough to hold a sheet of matzah.  Chill in fridge until ready to use.
  2. Whisk 1 cup cream and mascarpone in a medium bowl until smooth.
  3. Combine egg yolks, 1/3 cup sugar, and 2 Tbsp water in the top of a double boiler or a heat proof bowl placed over a saucepan of simmering water.  Beat mixture on medium high with an electric mixer until eggs triple in volume and pale yellow (about 6-7 minutes).  Remove bowl from heat.
  4. Wash beaters and then beat the mascarpone mixture until medium peaks form.
  5. Fold the egg yolk mixture into the mascarpone until no streaks remain.
  6. Dip the first matzah into the chilled coffee mixture and let soak about 1 minute per side, until it's almost falling apart.  Place an an 8x8 baking dish.
  7. Spread 1/3 of the filling over.
  8. Sprinkle cocoa powder over the filling.
  9. Soak another sheet of matzah and layer on top.
  10. Spread half of remaining filling over and sprinkle with cocoa powder.
  11. Repeat layers one more time.
  12. Make ganache - place bittersweet chocolate in a bowl.
  13. Heat remaining cream until boiling, then pour over chocolate.  Let sit for a minute and then stir until chocolate has melted.
  14. Stir in remaining rum.  Let cool slightly before spreading on top of to.p sheet of matzah.  Chill until form at least 6 but up to 12 hours (the longer the better!)

Wednesday, March 25, 2020

Passover Friendly Easter Brunch: Broccoli and Leek Frittata


This may be a problems that only we face, but my inlaws find it absolutely impossible to find any Passover friendly foods for Easter.  On the off chance that there are others out there facing the same conundrum, I thought I would share some amazing Easter brunch foods, that also work for Passover.

In truth, it seems like the easiest thing - I mean, Easter is all about the eggs, right?  And eggs for breakfast is a very Passover thing. 

Let's be honest, eggs for everything is a very Passover thing.  We make good use of those hardboiled eggs we dye for Easter!


The best part about this frittata?  It doesn't really matter if you celebrate Easter or Passover.  Filled with green veggies that seem to just bridge the gap between winter and spring, this is really the perfect breakfast for any group gathering.  Or - since we're not supposed to be gathering in groups right now....this works really well to give you breakfasts (or lunches) for a couple days.  The vegetables inside are hearty and withstand a day or two in the fridge.


Broccoli and Leek Frittata
3 Tbsp olive oil
2 leeks, sliced thinly (white and light green parts only)
2 cloves garlic, crushed
1 head broccoli, chopped
2 Tbsp water
10 eggs
1/2 cup milk
1/2 cup cheddar cheese, grated
  1. Preheat oven to 350.  Heat 2 Tbsp oil in a large pan over medium-low heat.  
  2. Add the leeks and garlic and cook for 5 minutes.
  3. Add the broccoli and cook for an additional 5 minutes.
  4. Add the water, cover the pan, and cook for another 5 minutes.
  5. Add remaining Tbsp of oil.
  6. Whisk the eggs, milk, and salt and pepper to taste in a large bowl.
  7. Add the egg mixture to the cooked veggies and cook for 5 minutes.
  8. Sprinkle the cheese on top and place the pan in the oven for about 17 minutes, or until set.  Serve warm.


Wednesday, March 18, 2020

Passover Prep: Egyptian Haroset


This past Sunday was supposed to be Mitzvah Day at synagogue.  We gather together and do volunteer projects and community service.  Thatkid and I signed up to bake and package cookies for Holocaust survivors.  So my brilliant plan was to make the cookies with Thatkid and then blog about how amazing they were, sharing the recipe with you.


But with the Covid-19 Pandemic closing schools, businesses, and religious services, we also cancelled Mitzvah Day.  So instead of sharing cookie recipes, I'm going to use these next few weeks to share Passover/Easter recipes.  Especially since we won't be traveling for either this year!

We'll start with the Passover seder, which is especially timely as I just figured out I may be in charge of making my own - for the first time in years!!!!  I really need to get on that menu prep and start buying things as the supermarkets make them available.

One thing I know I'll have is haroset.  Haroset, one of the most traditional Passover foods beside matzoh is a dish made by combining fruit and nuts.  The color and texture is supposed to resemble the mortar used by the Israelites in construction during their time of enslavement in Egypt.   This is one of the big differences between the Sephardic (Mediterranean/Middle Eastern/African) Jews and Ashkenazi (Eastern European) Jews.  I grew up in the Ashkenazi tradition with haroset that never resembled mortar.  Instead, the Ashkenazi haroset is made of grated apples, nuts, red wine, cinnamon, and honey.  It is sweet and light and exceptionally fresh tasting.  It also does not keep all that well.

This Sephardic haroset will definitely last until Passover next month!  Made with dates, raisins, and sugar, it is easy to see the resemblance to mortar.  It is also exceedingly sweet!  I'm excited to try it with horseradish - a necessary combination at a seder.  So sticky and sweet, I also think it would make an excellent filling for a cinnamon roll.  Or a Passover version of a cinnamon roll.


Egyptian Haroset (From Joan Nathan's Jewish Holiday Cookbook)
1 lb raisins
8oz pitted dates
1/4 cup sugar
1/4 cup chopped walnuts or pecans
  1. Place the raisins and dates in a bowl with enough water to cover.  Let stand for 1 hour
  2. Add the sugar and whirl the mixture in a blender.
  3. Transfer to a heavy saucepan and let simmer over low heat until the fruits are cooked and the liquid is absorbed.
  4. Remove from the heat and place in a jar.  When cool, sprinkle with chopped nuts.


Wednesday, October 23, 2019

Legoland's Brick Or Treat: Witch Hat Cookies


It's that time of year again, time for us to dig into as much Halloween fun as we can find.  As usual, this means starting the holiday off with a BOO at Legoland's Brick or Treat.

Brick or Treat happens every Saturday in October, so this coming Saturday is the last night of the event.  It's an additional add on to your regular ticket (or membership for most levels), but well worth it.  It's so much fun to get dressed up and run around the park in the dark, with the bonus of collecting candy and treats!


Brick or Treat starts at 5pm and goes until 9pm, so after years of experience, we know not to get to the park too early.  It's a long day for kids.  We usually head over after nap time.  Which also helps the little guy not turn into an actual monster.  Once we get into the park we usually ride a few rides before changing into our costumes.

Costumes are not required for this event, but they make everything so much more fun, don't you think?  

The entire park is decorated in fun Halloween decor that is perfect for kids - not too spooky.  Even spooky elements like spiders take on an air of fun when they're jamming to rock music.  There are seasonal specialty foods offered, although we always end up at the pizza and pasta buffet - a good deal for refillable drinks and a place to fill up on something other than candy.

There are so many different events during the night.  Dance parties, shows, stilt walkers and entertainers, people who go around with bubble carts.  The kids usually enter the costume contest, which is always emcee'd  by the best performer who interviews all the kids and is so quick witted.  This year the kids opted not to participate in the contest so they could have more time for rides.   And we rode lots of rides this year.  While most of the rides aren't done any differently for Halloween, it's fun to ride them in costume, or get to ride them at night when it's dark.  The one exception is the "Coast Cruise" which is revamped as the "Ghost Cruise" with corny Halloween jokes instead of corny regular jokes.


In addition to the costumes, shows, and rides, the big draw for Brick or Treat is, obviously, the Treat part.  There are treat stations set up all over the park.  The treats handed out are things that don't melt - things like granola bars, apple sauce, jolly ranchers, sour straws, lollipops, starburst, laffy taffy, and there's always a collectible lego brick and a lego magazine. 


We always end up closing down the park, so our pro tip is to bring pajamas for the kids to change into for the ride home.  They always fall asleep during the drive, which is nice for Thatboy and I.  Because they're not the only ones exhausted!

Know Before You Go

Hours:  5-9pm

Admission: $64, parking is not included and costs $18 on the weekend

Packages: Packages available to add on a day at Legoland, 2 day admission, or even a hotel stay.

See Brick or Treat Tickets on Legoland's website for more information.


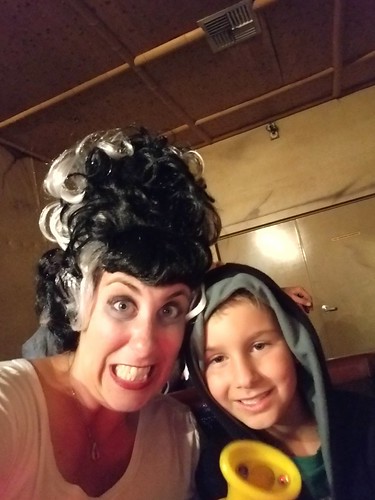
In honor of our classic monster costumes, I wanted to make a classic monster cookie.  I've been seeing witch hat cookies all over the internet.  I grew up with these, called peanut butter blossoms, which my mom made every Christmas.  It's weird to see them rebranded as Halloween cookies.  Especially when they don't even look like witch hats - have you ever seen a two toned witch hat?  I felt like I could improve upon the idea very easily.  Take away the peanut butter base and sub in something darker.  My original thought was a chocolate crack cookie, but then I was thumbing through my Maida Heatter cookie book and found something even better.  She calls them "Down East Chocolate Cookies" - an almond chocolate cookie with no flour, so they spread into a nice, flat circle.  But also, because of the use of almond paste, instead of flour they have the most wonderful, dense, chewy quality.  I've seen them described as the texture of a tootsie roll, and that's not far off.  So delightfully decadent, dark, and sinful they make the perfect Halloween treat.  No tricks.

Witch Hat Cookies (Adapted from Maida Heatter's Down East Chocolate Cookies)
1 1/2 oz unsweetened chocolate
3 oz unsalted butter
3/4 cup granulated sugar
1/8 tsp salt
3 1/2 oz almond paste
1 egg
1/2 tsp almond extract
24 Hershey kisses, unwrapped
  1. Place the chocolate and butter in the top of a large double boiler, uncovered, over warm water on moderate heat.  Stir frequently until melted.
  2. Add the sugar and salt and stir to mix. 
  3. Add the almond paste and stir until the almond paste is completely blended.
  4. Remove the top of the double boiler from the heat and whisk in the egg and almond extract until smooth.  Let the mixture cool, then place in the freezer for 30 minutes.

  5. Preheat oven to 300.  Place aluminum foil on a cookie sheets with only one raised side.  Drop batter by rounded teaspoons-ful onto the cookie sheet.  Do not place more than 6 on each cookie sheet because they will spread.  Bake for 21 minutes reversing sheets top to bottom and front to back during baking to ensure even baking.
  6. Remove from oven and let them cool for one minute, before putting the kisses in the middle of the cookies.  Let cool completely on the foil.  When completely cool, peel the foil away from the backs of the cookies.

Wednesday, July 03, 2019

Easter-ing: Strawberry Orangeade


For the first time in years we didn't travel to the inlaws for Easter.  It was a combination of a bunch of things.  Typically the week before Easter we're bouncing between Arizona, LA, and the Bay Area.  Basically unpacking suitcases, running from airport to airport, and generally being exhausted by the time the week is over.  Add to that the fact that Thatboy's family makes no accommodation for us as we do all that running around and traveling to them while keeping Passover and we're all pretty hungry, crabby, and hurt by the time Easter is over.

So this year, we cut out 2 flights, the inability to eat for 3 days, and stayed home.  It was marvelous.  We started the weekend by dying eggs. 


And we combined our traditions by eating matzah brei as we did it.  Passover AND Easter!  Together at last.  


While our eggs dried, we headed over to Kenny's Strawberry Farm, where they were having their own Easter celebration.


Plus, I mean - strawberry picking!


It was such a mellow way to spend the morning and a great way to ring in Easter.  While Thatboy waited in line to pay for our haul, the kids were entertained with balloon animals.


And while we couldn't partake in the strawberry doughnuts, because of Passover, we could definitely indulge in strawberry milkshakes.


The next morning, the boys did a little Easter egg hunting in our yard.


Then we headed over to do another hunt with friends.


But the best part for us was the fact that we could actually eat an Easter meal!  No matter how many years (19) we've been spending with the inlaws, they refuse to acknowledge that Passover occurs at the same time, and so they don't make any food we can eat.  Thatboy even got into a huge fight with his brother last year when he asked if we could please have something to eat other than the pizza and lasagna they serve every year.   They make it seem like it's a huge deal to serve anything that doesn't contain bread or noodles, so let me show you just how hard it is.  With the reminder that we were out of town for almost the entire week before.


I purchased a Passover-friendly frozen pie crust and created a brie and apple tart.


Passover plum muffins


Crustless quiche


Passover pancakes (made in a sheet so I didn't have to stand over the stove that morning flipping pancakes)


Passover raspberry rolls


Goat cheese and beet salad


And of course, the easiest Passover friendly food - fruit salad.  With out fresh picked strawberries of course!


But that fruit salad isn't the only thing we used our strawberries for.  We have an orange tree in our backyard that is dying.  But with all the rain this year, we still got oranges!  So with a huge crate of oranges and a huge carton of strawberries, I tried to think of a good way to use them both.  Strawberry orangeade it was.  Perfect for the summer, and even more perfect to freeze into popsicles.  It's the gift that keeps on giving. 

Strawberry Orangeade
3 cups strawberries
3 cups freshly squeezed orange juice
3 Tbsp sugar (if not using fresh oranges, reduce or eliminate the sugar)
  1. Puree strawberries in the food processor.
  2. Using a fine mesh sieve, press the strawberry puree through, discarding the seeds.
  3. Stir together the strained puree, the orange juice, and the sugar. 

Wednesday, April 24, 2019

Bye Bye Pandas: Passover Pandaberry Muffins


Ever since I was a little girl, I was obsessed with the San Diego Zoo.  And this is years before we even lived in California.   When I was in 4th grade, living in Pennsylvania I decided I wanted to be a veterinarian at the San Diego Zoo.  My parents went to San Diego for a conference and brought home a book from the zoo and it was one of my most treasured possessions. 

One of the best parts of the zoo, in my opinion, were the pandas.  I love the pandas at the zoo.  So given all that history you can imagine my immense disappointment when I learned last month that the pandas were leaving the zoo at the end of April.

The pandas at the zoo were on loan from China as part of a breeding program.  The program was successful, and now that the last of the babies are old enough to have babies of their own, it's time for them to go home.

Obviously we had to go visit before the last ones left.  We even waited in a ridiculously long line, because we were not the only ones with this idea.

Alllllmost there!  We could see the not-so-little guy!


There he is! Completely oblivious, just munching away on his bamboo.


I just love this picture.  Thatkid looks completely mesmerized.  He didn't want to leave.  He just wanted to stand there and watch.


Bye bye pandas!  Come back and visit ANYTIME!


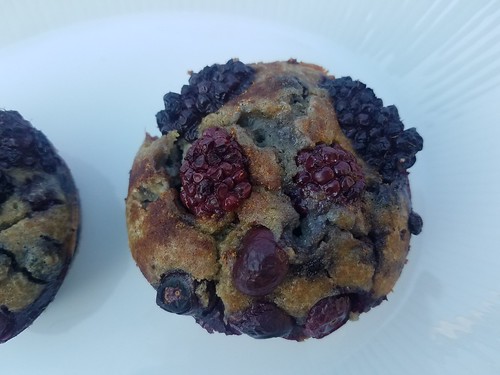
I wanted to commemorate the event with a special panda treat - but we're a little limited right now with Passover.  But, Passover muffins are something we go through like gangbusters in this house, so panda-fying some Passover muffins seemed like a good way to go.

Because it's for Passover, this is also a great gluten-free recipe for use year round.  

Passover Pandaberry Muffins
1/4 cup almond flour
2 Tbsp coconut flour
2 Tbsp tapioca flour
1/4 tsp salt
1 ripe banana, mashed
1 Tbsp vanilla extract
2 Tbsp coconut oil, melted
3 eggs
1/2 cup blueberries
1/2 cup blackberries
  1. Preheat oven to 350.  Grease 6 cups of a muffin tin.  Whisk together the flours, starch, and salt.
  2. Combine the banana, coconut oil, and vanilla in the bowl of an electric mixer.
  3. Add one at a time, blending between each addition.
  4. Add in the dry ingredients and mix just until blended.
  5. Stir in berries.  Divide between the muffin cups.
  6. Use blackberries and blueberries to create a panda face on the top of each muffin.  Bake for 20-25 minutes, until they are golden brown.  Let cool in pan and enjoy!