This past weekend I ventured out to Palm Springs for NotMya's bachleorette party. It was my first weekend away from Thatbaby, and it was totally worth it - even though I had to leave the action to pump every few hours.
Reason #1: Since NotMya's favorite movie is "Girls Just Want to Have Fun" we all dressed up for the occasion. We were blinding in our neon and everyone was a great sport and went all out.
Reason #2: Even though I didn't get to bed till 2am, I got to sleep in till 10:30am. 10:30 AM. I can't tell you the last time I've slept in, the last time "sleeping in" meant later than 8am, or the last time I got over 8 hours of consecutive sleep in a row.
Reason #3: Leaving Thatboy home alone with Thatbaby made him eternally grateful for everything I do. One of the first things he said to me was "I don't know how you do that every night!"
I know it's a silly thing to say - since this is what teamwork is all about, but I'm so thankful that Thatboy was cool with me taking off with the girls for the weekend. I feel really lucky that I have a husband competent enough to handle the rigors of parenthood on his own (even if he did go running for the hills moments after I got home).
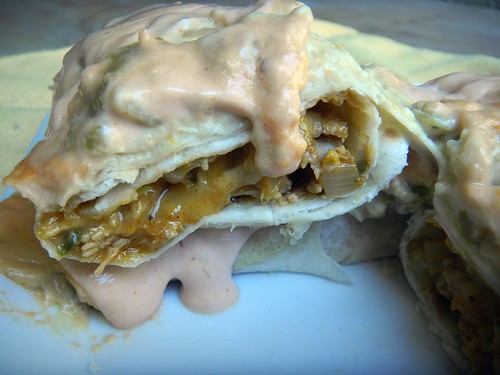
No matter way to show my gratitude than a quick, easy dinner that is sure to make him happy. Grilled chicken in a sweet sauce with some pineapple. On a great crusty roll. Because even though I got some extra sleep, an easy dinner was totally what I needed as he handed me a baby and ran out the door. (Don't worry - he came back. You would too if you had this waiting for you for dinner!)
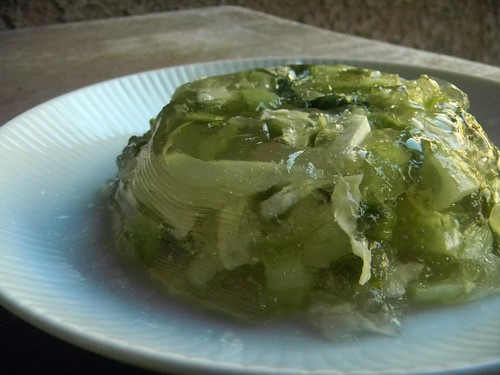
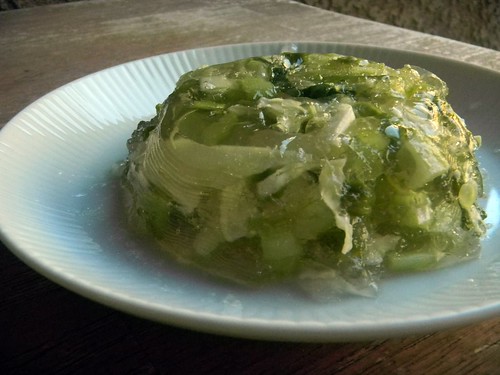
This is it - the last aspic you'll see round these parts for a while. Thatboy is a good sport, but I can only rely on his patience for so long. I know his breaking point.
And I know to quit while I'm ahead. So when he gobbled up this aspic declaring it his favorite, I thought it would be a good one to end on.
With the crisp green vegetables and vinegar, this almost reminded us of a cole slaw. Of course, that could also be the cabbage element. It was perfect for a warm spring day - back before these spring days got cold and wet.
Jellied Vegetable Ring (from the Fannie Farmer Cookbook)
1 envelope gelatin
1/4 cup sugar
1/4 cup cider vinegar
3 Tbsp lemon juice
1 tsp salt
1/2 cup chopped celery
1/3 cup chopped cabbage
1/8 cup peeled, seeded, and cubed cucumber
1/4 cup defrosted frozen peas
Mix 1 cup cold water, gelatin, and sugar in a saucepan.
Stir over low heat until dissolved.
Add the vinegar, lemon juice, and salt, and chill until as thick as an unbeaten egg white.
Stir in the vegetables, pour into a 4 cup bowl and chill.
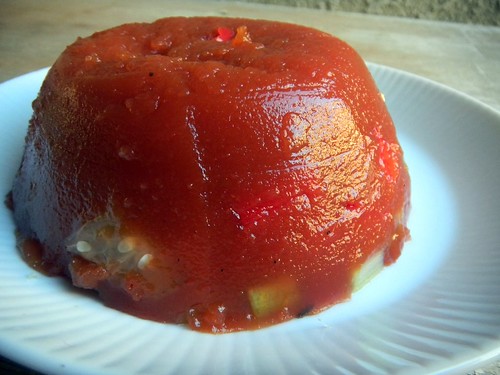
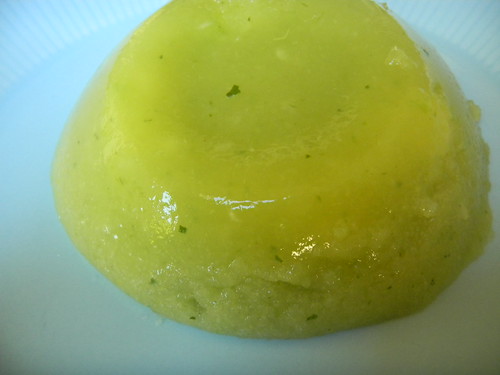
I know, one look at this aspic and you're already wondering what on earth I've been smoking. Because this aspic may very well be the least appetizing thing you've seen all day.
It's lacking the smooth glossy finish of the aspics you've come to know and love over the past week. Instead it is one blobby mass. It's the Charlie Brown Christmas Tree of aspics. Or better yet - this is the Sloth of aspics.
What does that mean? This aspic may be ugly, but it's got a lot of heart. Heart is the secret ingredient in any good cook's repertoire. And this homely little dish is special because it's made from scratch. Unlike the other tomato aspics which use tomato juice or canned tomatoes, this uses fresh tomatoes I cut up myself.
It's not as instantly pleasing as yesterday's aspic. It's simpler and more complicated at the same time and deserving of its very own post. Because a mother loves all her children equally - even the ugly ones.
Fresh Tomato Aspic (From the Fannie Farmer Cookbook)s
2 lb ripe tomatoes, chopped
1 envelope gelatin
1 tsp grated onion
1/4 cup minced celery and leaves
salt
up to 1 tsp sugar
1 Tbsp lemon juice
Boil the tomatoes with 3/4 cup water over medium high heat, stirring often, for 15 minutes.
Dissolve the gelatin in 1/4 cup cold water.
Puree the tomatoes and then return the puree to the pan.
Add the onion and celery.
Add salt to taste and sugar and lemon. Cook 5 minutes, stirring briskly.
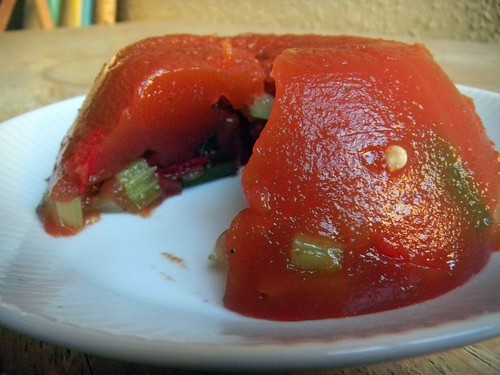
I mentioned last week about playing around with aspics. In the mid-20th century, one of the more popular aspics was a tomato aspic. In fact, if you ask someone if they've ever heard of aspic, the tomato based form might be the one they're most familiar with.
I tried playing around with various tomato aspics. I found them to be similar to gazpacho in taste - a cold tomato base. Of the ones I tried, the most basic, made with gelatin and tomato juice, was also the least appetizing. The one that won us over was this pretty little number, studded with vegetables. Which perhaps makes it even more like a gazpacho.
The cool refreshing flavor makes it a nice treat for a summer day, and the vibrant red and green hue make it seem fitting for Christmas. Even more so when you slice it open to reveal the treasures inside.
What aspic will our heroine pull from the kitchen next?
How many varieties of tomato aspic can there possibly be? Why doesn't she just stick to jello?
Stay tuned to our next episode for the answer to these and all your other pressing questions.
Tomato Aspic with Vegetables (From the Fannie Farmer Cookbook)
1 lb 12 oz can of tomatoes
1/2 tsp sugar
1 onion, sliced
2 bay leaves
6 basil leaves
1/2 tsp salt
1/4 tsp pepper
1 envelope gelatin
1/3 cup beef broth
1 1/2 cups finely diced raw vegetables
Simmer the tomatoes, sugar, onion, bay leaves, basil, salt, and pepper 15 minutes.
Soak the gelatin in the beef broth plus 2 Tbsp water.
Strain the tomatoes. Mix the gelatin into the hot liquid until thoroughly dissolved.
Fill the bottom 1/2 inch of a 1 quart bowl with the liquid. Chill until just set.
Distribute the vegetables over the surface and add remaining liquid. Chill until completely set.
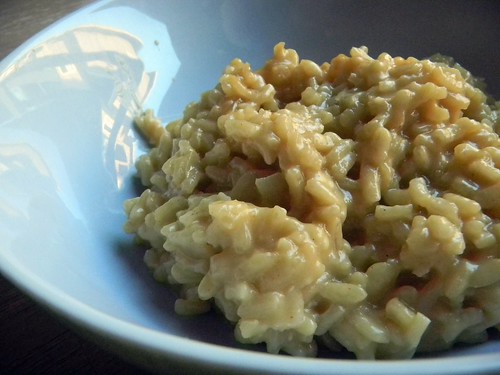
I'm a sucker for risotto. There's something so delicate about the individual rice kernels. And the process of making risotto is almost romantic. First you loosen the kernels up with a bit of wine or champagne. The constant stirring is like the artful attention of a compassionate lover. At the end, the cheese is added - a mild selection that seems to melt into the very soul of the rice.
But just as every woman does not need to be wined and dined, some risottos don't need the champagne and caviar treatment. Like this one. It's your working class risotto. This risotto likes a good brew with her pizza. This risotto finds his tractor sexy.
This recipe comes from my dear friend Faye who is working her way back home as we speak! After spending far too many years on distant shores she is finally coming back to San Diego! Sure she's a couple years older and will be bringing home a couple more kids than she left with, but we're happy to have her just the same. And when we get together, there's no wasting wine with cooking. That stuff goes straight to the glass!
Beer and Cheddar Risotto
1/2 onion, diced
1 cloves garlic, minced
1 tablespoon butter
2 tablespoons olive oil
2 cups Arborio rice
12 oz. bottle of beer
49.5 ounce can of chicken broth
5 ounces sharp cheddar cheese, shredded
1/3 cup mozzarella cheese, shredded
1/3 cup Parmesan cheese, shredded
1/4 teaspoon cayenne pepper
Pour chicken broth into medium saucepan and heat over low heat.
Heat a separate large pan over medium low heat. Melt butter and olive oil in the pan.
Add the onion and saute for 3-5 minutes, until soft and translucent.
Raise heat to medium high and add garlic. Cook just until garlic is fragrant.
Add rice and saute for 2 minutes, stirring constantly until opaque, adding more olive oil as necessary to coat the rice.
Pour in beer, turn heat up to high until it starts to simmer.
Reduce heat back to medium-low and add the chicken broth 1/2 cup at a time, stirring until liquid dissolves.
Remove from heat and stir in the cheeses and cayenne pepper.
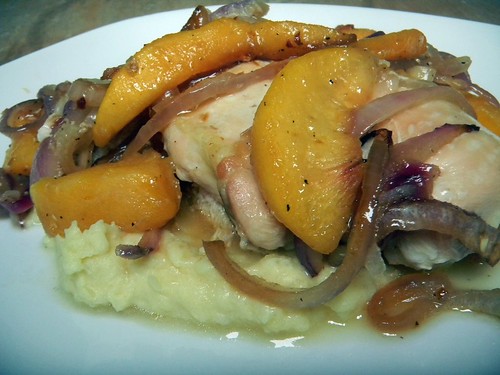
Although he has five senses, Thatboy is largely ruled by his sense of smell. I'd make some remark about men and pheromones here, but I'm really just thankful he's sitting beside me right now since we just finished a grueling workout.
Nothing can make or break our dinner like the smells that emanate from the kitchen. "What smells like feet?" is the constant question whenever I use apple cider vinegar. Conversely, all I need to do is saute some onions and garlic and I have myself a happy husband.
A couple weeks back I discovered another olefactory secret - my husband loves the smell of sesame oil. So when I started making this dish, he immediately began peppering me with excited questions about dinner.
Which is good, because my husband also doesn't like mixing his meats and fruit.
So when two senses are at work (taste v. smell) which one wins out? In this case, smell. Thatboy definitely liked this dish. It probably doesn't hurt that it's a pretty good dish. A much healthier take on sweet and sour chicken - no breading, no frying, but many of the same great flavors.
Have you ever heard of aspic? Thatboy hadn't. I had - but only in a vague Great Gatsby-esque sort of reference. I knew it was served as some kind of side dish, a side dish that never gets made anymore. Or at least not in my circles.
Which means it's time for a resurrection. What's old is new again. As evidenced by the neon 80s outfits that are seen in every store right now.
Except, I know nothing about aspics. So, I turned to someone who I'm sure made a quite a few in her time - Fannie Farmer.
So get ready, buckle in to you time machines, and take a journey with me.
Meat aspics came first, dating back to the 1300s, but we'll start with something more user friendly - the cucumber aspic!
Everyone likes cucumber, and the texture isn't too far off from the cucumber itself - cold and refreshing. It's the perfect introduction.
Cucumber Aspic (from The Fannie Farmer Cookbook)
1/2 cup freshly squeezed orange juice
1 envelope gelatin
2 medium cucumbers
3 scallions
4 sprigs parsley
1 tsp salt
3 Tbsp lime juice
Put the orange juice in a small pan and sprinkle the gelatin over. Stir over low heat just until the gelatin dissolves.
Peel and split the cucumber lengthwise. Scoop out the seeds, then chop cucumber roughly and put in the blender.
Roughly chop the scallions and add them to cucumber along with the rest of the ingredients.
Add the orange juice and blend until pureed.
Chill until the mixture begins to set, then stir well and pour into a lightly oiled mold. Chill until set.
Growing up in Southwestern PA we certainly didn't have authentic Mexican food. We had Taco Bell.
The nearest "Mexican" restaurant was 45 minutes away. It was a chain and they had margaritas. Which is what made them a "Mexican" restaurant.
However, it wasn't until we moved to California that I realized the quotes were needed around the word Mexican. Because the food that the restaurant served was not Mexican food. It was an American version of Mexican-like dishes. Fake-xican, if you will.
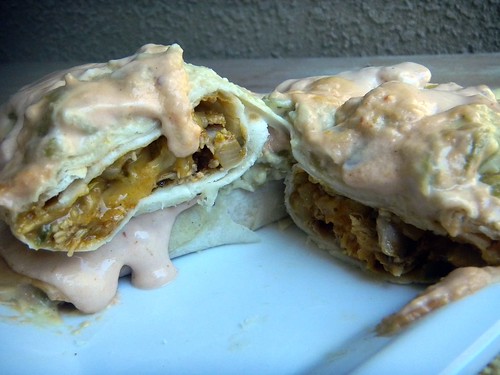
Which is not to say the food they served wasn't delicious. I still think about the chimichangas I used to order which was the highlight of the menu for me. Which is why I thought it might be fun to make some at home. The chimichangas at the restaurant were deep fried, but as you probably know by now, most of the time when I bake things instead of frying them. This time is no different.
Flour tortillas, wrapped around chicken and cheese and baked. Afterwards topped with a truly inauthentic sauce. It's not Mexican, but you'll love it anyway.
Baked Chimichangas
2 chicken breasts, cooked and shredded 1 cup salsa
1 onion, chopped
3/4 tsp ground cumin
1 sprig oregano
6 flour tortillas
1 cup shredded cheddar cheese 1/4 cup sour cream 1 Tbsp chili sauce dash of cayenne pepper
4 oz can of chopped green chiles
Preheat oven to 425. Combine the chicken, salsa, onion, cumin, and oregano in a large skillet. Cook until heated through.
Divide the chicken between the tortillas, placing the chicken in the center of each tortilla.
Divide the cheese over the chicken mixture. Fold in the ends of the tortilla and roll up.
Place the chimichangas seam side down in a large baking
dish. Bake for 15 minutes.
While the chimichangas are baking, combine the sour cream, chili sauce, cayenne pepper, and chiles.
Sometimes I worry about Thatboy. I don't mean in the typical "did you take your vitamins" type worry. I worry that I might have married a teenage girl by accident. I obviously didn't do a thorough background check.
It started with Twilight - a series that I couldn't get through. He devoured them and anxiously awaited for the movies to come out. Like a dutiful wife, I attended the first two movies with him. And then he asked me not to come with him anymore. Apparently laughing at adult women tearing up as teenage boys remove their shirts wasn't adding anything to the movie for him.
Based on his love of the series, I told him I thought he would probably like The Hunger Games series. I didn't know what it was about, but I knew that teenage girls everywhere were all over them. He wasn't interested.
Until...he was. He asked for the series for Channukah and finished it shortly before the movie came out. Although, it was doubtful we'd be able to see the movie while it was in theaters. One of the perils of having a newborn is that it is very hard to get to the movie theater.
But then I got a fortuitous weekly email.
Me: It's too bad you have to work on Thursdays.
Thatboy: Why?
Me: Because this week's Parent Movie Morning is Hunger Games.
Thatboy: I think I can miss a little work....
And so, we found ourselves amid a sea of other women, husbands, and babies so we could watch the movie. I love Parent Movie Mornings.
What's funny is that my boss also took off work to see the movie - on opening day. He called in "sick" with "stomach problems." When he called in to check in, he confided he wasn't sure if it was a virus or "hunger."
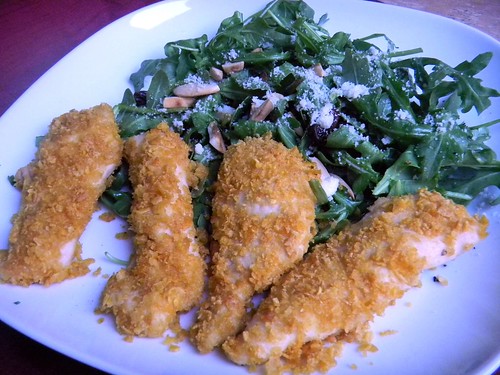
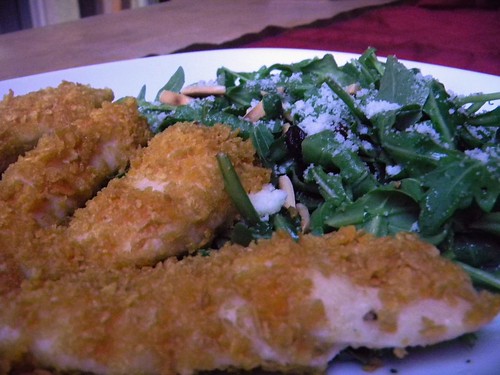
If you can't decide what your stomach issues are, hunger isn't a bad thought. And I've got a fantastic cure for that - a hearty salad with chicken fingers. It's such an awful thing to do to a salad - take some nice, healthy greens and throw something breaded on top. I do have to say that this is a guilty pleasure salad. It's not all bad - I bake the chicken fingers instead of frying them. But still. Maybe I shouldn't call it a salad. Let's pretend I'm just healthying up chicken fingers. Look at all those greens!
Chicken Finger Salad
1 1/2 Tbsp salt
1 chicken breast, cut into strips
3 Tbsp flour
3 Tbsp melted butter
3 cups cornflakes, crushed
2 cups arugula
1/4 cup blanched slivered almonds
1/4 cup raisins
1 Tbsp lemon olive oil
juice of 1/2 lemon
Parmesan Cheese
salt and pepper
Create a brine by combining the salt with 2 cups of cold water.
Place the brine and the chicken strips in a ziplock bag and refrigerate for half an hour.
Preheat oven to 400. Place flour, butter, and crushed corn flakes in separate shallow bowls.
When chicken is done marinating, dry with paper towels then dip in flour, butter, and then corn flakes. Bake the chicken for 15 minutes.
While chicken is baking, toast the almonds in a skillet.
Place the arugula in a large bowl and drizzle the olive oil and lemon juice over.
Sprinkle with salt and pepper to taste, and toss.
Sprinkle the raisins, almonds, and cheese over top.
Divide the salad between two plates and top with the baked chicken fingers.
During Passover I attempted to make apple muffins. After they exploded all over my oven what remained lacked the typical muffin consistency. Always a problem with Passover baked goods. They ended up more like apples in crumbs.
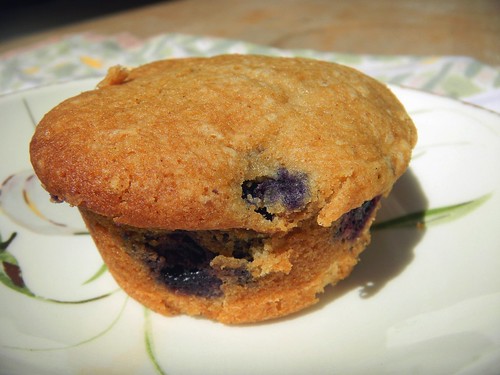
Now that Passover is over, I can return to the muffins I love so very much. Blueberry are one of my favorite muffins. I prefer pumpkin muffins, but blueberry muffins have the added benefit of being associated with childhood memories. Because Thatmom used to make blueberry muffins for special morning breakfasts.
We didn't do pancakes - we were muffin people. So blueberry muffins will always remind me of coming out to breakfast with giant muffins, sprinkled with sugar, waiting - fresh from the oven.
I can never get my sugar sprinkles to work out the way Thatmom did. She must have had a touch of magic with her. But even without sugar on top, a blueberry muffin is one of the best ways to start the day.
Oh pasta - how I've missed you. I know that our relationship has its ups and downs. There are moments in a fit of rage where I've sworn you off - your carby goodness interfering with my other relationships, like the one with the top button of my pants.
But I always come back. I guess I just don't know what's good for me.
I also seem to be a glutton for punishment when it comes to making dinner. I really need to work on not planning elaborate meals for weeknights. I either need to prep everything beforehand or find something really easy.
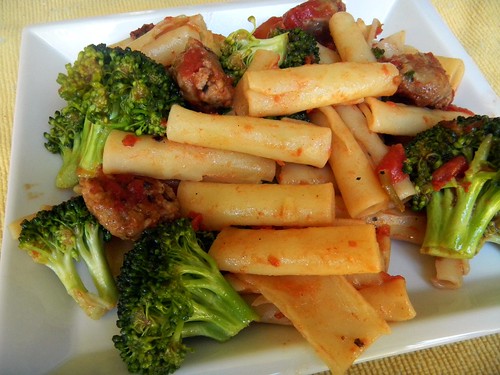
And this dish? This dish is really easy. It's hardly a recipe at all. This dish makes my "chop up fresh tomatoes and toss with olive oil and garlic" recipe seem complicated. Mostly because it involves chopping. This recipe does not. It does require the use of a can opener, so if that seems above your skill level, consult with an adult who can help you out.
1 pound Italian sausage links, cut into 1/2-inch slices
1/4 teaspoon crushed red pepper flakes
Grated Parmesan cheese
Cook ziti. Place broccoli in the strainer and drain the pasta into the strainer so the pasta water cooks the broccoli as it passes through. (One of these days I'll remember to take a picture of this)
Cook sausage in a large skillet over medium heat until browned.
Add red pepper flakes and cook for 1minute.
Stir in the tomatoes and their juices. Heat through.
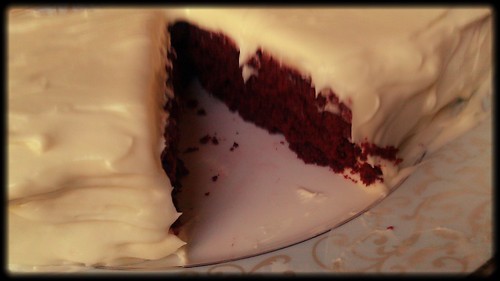
I've already told you about what a hit the packaged Passover Red Velvet cake was. Which was a big surprise. Mostly because Passover desserts? They're awful. Goes back to that "no flour" thing.
Growing up, my recollections of Passover desserts were sandy tasting cookies and cakes. And those were the recipes passed down from grandmothers and their synagogue cookbooks. The prepackaged stuff was even worse.
The only exception, was the stuff from the Jewish bakeries. In small town Pennsylvania, that meant we had to either drive 2 1/2 hours to Pittsburgh, where we did our annual Passover shopping, or (depending on when our school spring break fell) 8 hours to Brooklyn where we'd load up on the REALLY good stuff.
That stuff was usually gone after the second seder.
But since moving to California, I have yet to find a good Jewish bakery. Which puts us back to the crappy desserts. I typically make some amazing almond horns, but this year brought about some new favorites. For my mom's Seder I made Cara's "Grandma's Raspberry Squares." The reason these are so fantastic is because they taste delicious, but also because I can't think of an easier dessert to throw together.
These were such a hit at the Seder that everyone requested a copy of the recipe. And we spent a pretty long time discussing all the variations that could be made.
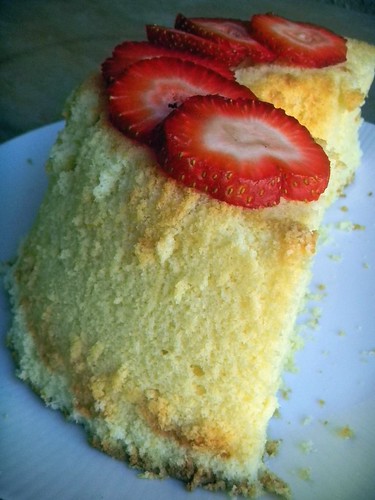
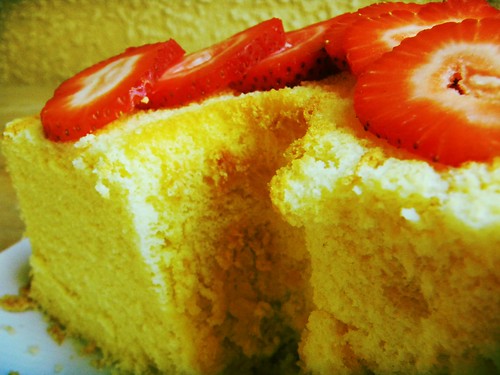
Some time during that weekend, Thatboy remembered he had a work party on Monday that he needed to bring something in for. Rather than subject his coworkers to Passover baked goods, we were going to pick something up at the store. Buuuuut we forgot. So Sunday had me crossing my fingers and hoping for the best with a lemon chiffon cake.
Crossing my fingers and hoping for the best apparently works really well. Because this cake was good. Thatboy texted me from his office to tell me that the cake was good.
Me: Even though it's a Passover cake?
TB: Especially because it's a Passover cake!
He was licking up crumbs on the way home, thankful I had kept half the cake for us. And we've spent all week enjoying it. I know Channukah is the holiday with miracles, but what else would you call it when a cake lasts for 5 days without even the hint of dryness? It's a Passover Phenomenon.
1/2 cup lemon juice
4 teaspoons grated lemon zest
2/3 cup matzo cake meal
2/3 cup potato starch
8 eggs, separated
1 egg
1 2/3 cups superfine sugar, divided
1/3 cup oil
1/4 teaspoon salt
Preheat the oven to 350 degrees. Bring the lemon juice and grated zest to a boil in a small saucepan. Reduce the heat and simmer 4 to 5 minutes. Set aside to cool.
Combine the matzo cake meal and potato starch in a small bowl.
Place the egg yolks and whole egg in the small bowl of an electric
mixer. Beat on medium speed until the mixture begins to thicken, about 3
to 4 minutes.
Add 1 cup of sugar, 1 tablespoon at a time, and continue beating until the mixture turns pale
yellow and is very thick. Scrape the sides of the bowl occasionally.
Slowly add the oil in a steady stream.
Reduce the speed to medium-low. Add the cooled lemon juice and zest and
beat until blended.
Reduce the speed to low. Gradually add the sifted
dry ingredients and mix until the batter is smooth. Transfer to a large
mixing bowl. Set aside.
Place the egg whites in the large bowl of a mixer. Using clean beaters
or the whip attachment, beat the whites on medium speed until frothy.
Add the salt. Increase the speed to medium-high and gradually add the
remaining 2/3 cup of sugar at the side of the bowl, beating until soft
peaks form.
With a rubber spatula, fold 1/4 of the beaten whites into the yolk mixture to lighten it. Fold in the remaining whites.
Gently pour the batter into an ungreased tube pan. Smooth the top. Bake in the lower 1/3 of the oven
until the cake is golden brown and springy to the touch, 45 to 50
minutes.
Remove the cake from the oven and immediately invert the pan onto a wire
rack. Cool the cake completely in the pan.
Turn the cake upright and
run a thin, sharp knife around the sides of the pan, then around the
center tube. Remove cake from the pan.
Typically during Passover we eat the same things we eat when it's not Passover - we just cut out the starch portion of the meal. Most of our meals consist of protein and veggies. Like the grilled chicken and bok choy we had Monday night. Or tonight's steak and salad.
But this year I've decided to branch out and try some different Passover recipes. Tonight I'll hit up the main courses, and tomorrow I'll tell you a little about dessert.
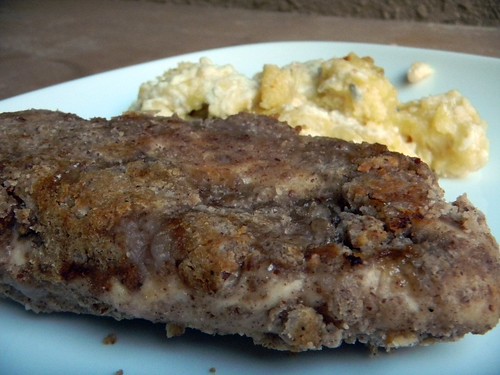
When I first saw this Honey and Pecan Crusted Chicken on Bookcase Foodie I knew it would go over well in our home. When Thatbrother and I were younger we were in charge of dinners on Tuesday nights, and baked chicken with honey and yogurt made a frequent appearance. And baked "fried" chicken is a common visitor in our home now.
Fried chicken doesn't usually make it onto a Passover table - not with that flour breading! But this potato starch and pecan coating is a nice substitute.
To go with the chicken I decided to forgo our usually veggie accompaniment and turn to our friend the potato. One of my favorite Italian dishes is gnocchi with gorgonzola cream sauce. This is not gnocchi. It's much, much easier. I call it - Potato Balls with Gorgonzola.
Potato Balls with Gorgonzola
2 large yukon gold potatoes
2 Tbsp grated parmesean
2 Tbsp matzo meal
1/2 cup half and half
1/4 cup gorgonzola cheese
1 Tbsp melted butter
Peel and quarter potatoes. Place them in a pot with water to cover. Bring to a boil. Reduce heat and simmer 20 minutes. Drain the potatoes and let cool slightly.
Preheat oven to 375. Mash the potatoes and add in 1 Tbsp parmesean and 1 Tbsp matzo meal.
Form the mashed potatoes into small balls and place them in a greased baking dish.
Pour half and half over the potatoes.
Sprinkle the gorgonzola over the potatoes in cream.
Combine the remaining parmesean, matzo meal, and melted butter until crumbly. Sprinkle over the top of the dish. Bake for 30 minutes.
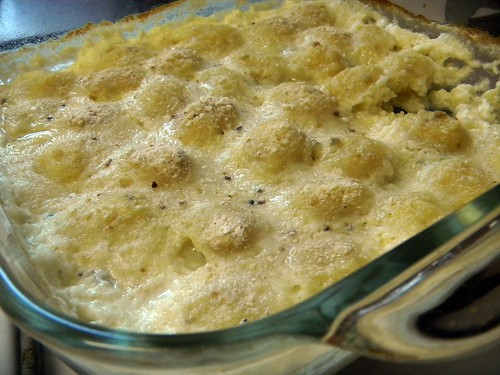
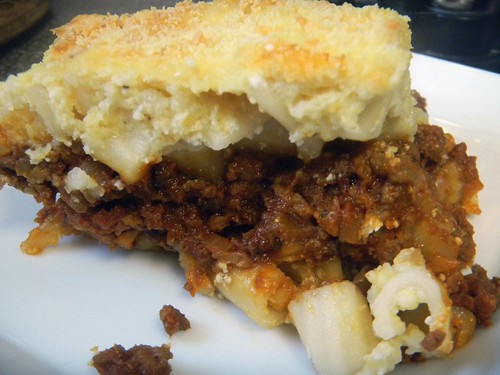
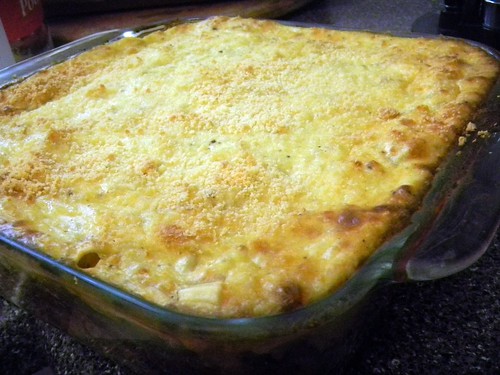
Every year I end up buying a bag of "Passover Pasta" to have on hand just in case. For a quick meal, or a side. Half the time we never end up eating it. The other half, Thatboy complains about how much he hates it. This year I decided to use it in a more creative way - making pastisio: a Greek lasagna-type dish that calls for round, hollow noodles instead of flat ones.
I couldn't find any Passover Pastisio recipes, so I decided to take a normal recipe and Passover-ize it. I went with one I trust - Elly's. (I pretty much trust anything she makes, but especially Greek dishes.)
Holy MOLY peoples. This is going to become a Passover tradition in our house. It would probably be good even not during Passover, but this is my new favorite Passover dish. SO delicious. And enough to have some for lunches throughout the week. Thatboy even had seconds - not bad for someone who doesn't like Passover pasta. He claims that the rest of it disguises the weird taste/consistency of the pasta. Thatbaby's favorite part was the meat sauce - but I already mentioned he's quite a carnivore.
When we traveled to Palm Desert we had to rent a bigger car to fit all of us and all of Thatbaby's stuff. All of that "stuff" is one of the reasons we're trying not to do a lot of plane travel this year. Which meant we got to spend Easter at home.
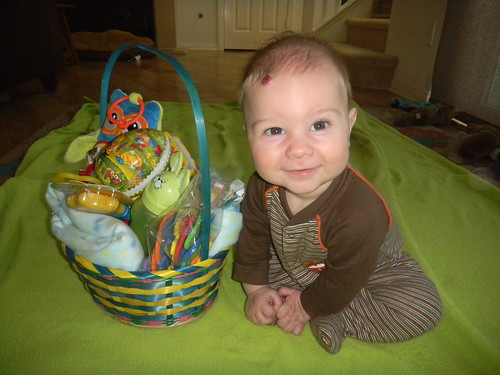
We started with an Easter Basket for the boys.
Thatboy's basket was filled with candy and a new t-shirt. Thatbaby had less edible/wearable things in his basket.
We also dyed eggs. I forgot how many eggs I go through at Passover, so we only had five left to dye.
We made them count. I always take the broken eggs to dye. Thatboy was pretty impressed with how mine turned out.
As usual with the Catholic holidays we celebrate, I let Thatboy pick the meal. Easter, however, has to obviously fit within the Passover restrictions. Which means I don't make the rice that his parents serve, or rolls/buns/bread that they also put on the table every year. And I don't make any pies like his mom does for each Easter.
Thatboy requested lamb - either rack of lamb, or leg of lamb. Since I made him rack of lamb for Christmas, I thought I would go with something different. There was a miscommunication however, because he thought "leg of lamb" but he told me "lamb shanks." So we had shanks for dinner. In my very humble opinion, braised lamb shanks are the way to go.
Pomegranate Molasses Braised Lamb Shanks
2 lamb shanks
2 Tbsp olive oil
1/2 onion, chopped
1 carrot, chopped
1 garlic clove, sliced
1/4 tsp ground cardamom
1 cinnamon stick
1/2 cup pomegranate molasses
Preheat oven to 350. Heat oil in a large pan over medium heat. Brown lamb shanks on all sides and remove from heat.
Add onion, carrot, and garlic. Saute until lightly brown, about 10 minutes.
Add cardamom and cinnamon and cook for 1 minute.
Stir in pomegranate molasses and 1 cup of boiling water.
Place lamb shanks in a baking dish. Pour the vegetables and liquid over the shanks. Cover the dish with foil and bake for 90 minutes, or until the meat is falling off the bone.
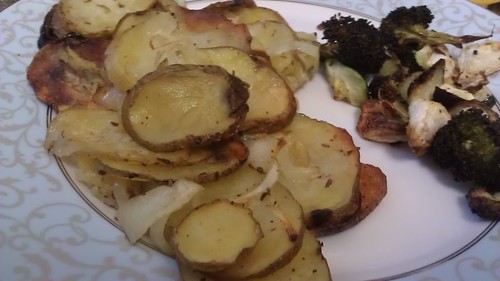
Since we couldn't do rice, I roasted some vegetables and turned to the number one Passover side dish - potatoes! I sliced them thin, tossed them with onions and melted bacon fat, and then roasted them in the oven.
But the piece de resistance was dessert. I picked up a box mix of Passover Red Velvet Cake. But I junked their frosting to make Passover Cream Cheese frosting (Passover ingredients, Sprinkles' recipe.) It was a HUGE hit. Thatboy was sneaking pieces for the next few days.
I love being able to make Easter special for Thatboy, even when he doesn't get to spend it with his family. And it's almost nicer for me to be able to eat all the dishes instead of watching everyone else eat food I can't!
The inlaws decided that 6 months was a good interval for visiting their new grandson. So the last weekend in March they headed down our way.
But, because even the thought of 5 days with a cute baby isn't entertainment enough, they suggested we take a vacation on their vacation! Because they'd never been to Palm Springs before. (Although TFIL did spend the entire time asking what city we were in every 5 minutes while we were there, so he still may not think he's been to Palm Springs.)
They spent the weekend alternately telling stories depicting their racism and insisting that The Hunger Games is about teen-gang-violence and deplorable.
It was a looooong weekend.
We ate at some of our usual haunts, like Pomme Frites and Normas. Thatboy never tires of their peanut butter and chocolate waffles.
Typically our trips to Palm Springs/Palm Desert includes lots of time outdoors and lots of shopping. Neither of which appeals to the inlaws. Instead, we went to an art museum.
Even though it was the only art museum in town, TMIL was positive that she had read about a different one five years ago in the San Francisco Chronicle and Thatboy spent forever trying to find the one she wanted.
TFIL ditched us as soon as we entered because he was very uninterested. Partly because he hates art. Partly because one of the exhibits featured naked people which is very much something he disapproves of.
We also got to spend lots of time at the pool. Reading -
And Thatbaby got his first pool time. He wasn't a fan at first, but once we got him into some warmer water he decided it was pretty fun.
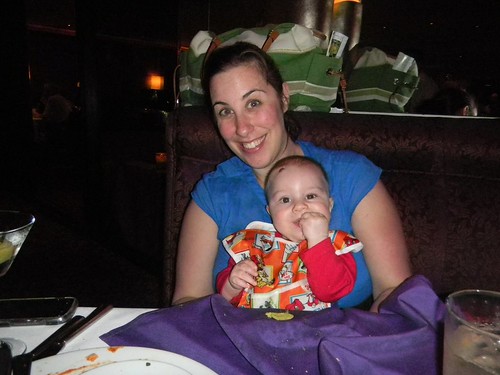
Thatboy came away from the weekend a little depressed, which always gets me fired up against the inlaws. Somehow, even when they're visiting with us, they still manage to make him feel ignored and unimportant. I know he worries about Thatbaby feeling the same way, but it's easy to convince him that he's a stupendous, loving, devoted father. I mean - just look at the photographic evidence!
As a warning, this post is going to be completely baby-oriented, so I promise I won't be offended if you decide to move along without reading each precious word that drops from my keyboard.
I don't want to become the girl who is always writing about her kid, so I do try to temper how often Thatbaby makes an appearance on the blog. But this entry seems really appropriate since it deals with food.
And since our approach isn't yet the "conventional" approach, I thought it would be a great topic to write about in case anyone is interested, and to offer further support for anyone who is considering it.
Shortly after Thatbaby was born I learned about "Baby Led Weaning" (BLW). The approach, which skips cereals and purees entirely, starts babies off with "normal" food when they begin solids.
Peaches are apparently the nectarine's less delicious cousin
I did some reading up on the matter and really liked what I read. Other than the fact that it's much cheaper and easier to feed Thatbaby whatever we're eating (nothing extra to buy, no worry about carrying around a bottle of puree when we go out, no extra meals to prepare), the other benefits were even more appealing.
Things like encouraging healthy food choices and eating habits, decrease in childhood obesity, less picky eaters, improved motor skill development, improved speech development. And because the method requires waiting until 6 months (which is recommended by the AAP and WHO anyway), you can add in the benefits of increased immunity, decreased risk of heart disease, and decreased allergies.
Already a big fan of meats - sausage, steak, porkchops, lamb...
Never one to enter a situation unprepared, I read the "BLW bible" (Baby-led Weaning by Gill Rapely and Tracey Murkett) from cover to cover. The main idea behind the method is that the use of cereals and purees developed in the early 20th century when doctors, uneducated in infant nutrition (specifically breastfeeding) stepped in and began dictating how it should be done. As women were unable to breastfeed for as long as their predecessors, and formula did not provide the fabulous nutrition it does now, solids had to be introduced at an age when babies were unable to eat/digest it on their own. (This is also why the AAP has recognized that the old method of introducing solids at 4 months is outdated and should be postponed until 6 months, when babies' digestive systems are more developed.)
BLW, as the name implies, allows the "baby" to "lead" in food choices. You offer, and they take what they want/like. As with all methods of introducing solids, the beginning stages are all about playing with food/learning to eat. Since at 6 months infants still have a tongue thrust which pushes food out of their mouth, and a gag reflex far forward in their mouth, the baby doesn't really digest much in the first few weeks. Instead he learns about food's touch, texture, taste, mouthfeel, and all sorts of other good sensory information that just isn't available through spoonfeeding purees.
Green-beans are a favorite.
Thatbaby took to eating like a fish takes to water. His first meal consisted of blueberry pancakes, a turkey sausage, some green beans, and some homemade "jello." (grapefruit juice and gelatin, studded with pieces of avocado, grapefruit, and oranges.) We took video of the entire thing. If you watch, you'll see him as he begins to learn how to maneuver the food. You'll also see the infamous "gag" - one of the hallmarks of babyled weaning. Because their gag reflex is so far forward, a baby who puts food in his mouth will trigger the gag reflex much sooner than you or I. This reflex pushes the food forward and out of the mouth, forcing it away from the throat and any choking danger. Babies quickly learn not to put food as far back, which actually makes them less likely to choke than their spoonfed counterparts.
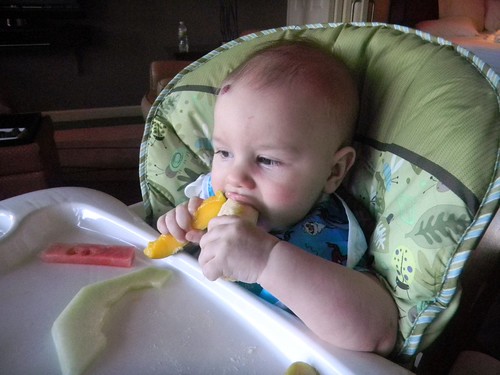
It's amazingly fun to watch him explore a wide variety of foods. Like his mama, Thatbaby is a big fan of vegetables, such as green beans and broccoli. He even seemed to enjoy okra! And he hasn't found a form of potato yet that he hasn't liked. Thatbaby also seems to be thoroughly enamored with fruits. Mango being his favorite, closely followed by watermelon (Thatboy's favorite).
He's already developing a taste for classic combinations. Perhaps he'll work at Jamba Juice like his dad and uncle.
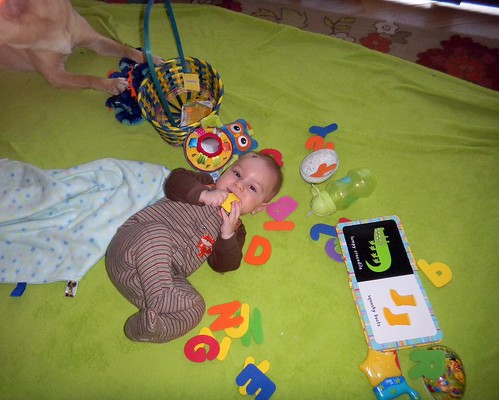
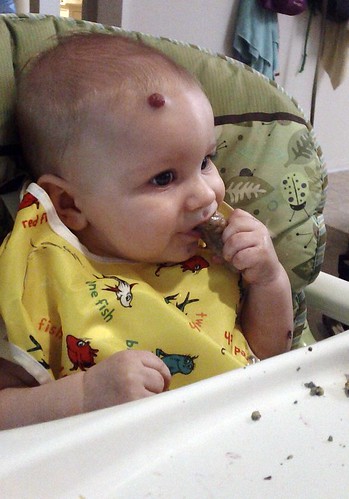
Thatbaby is also quite the carnivore. He enjoys meats and poultry of all kinds. Which is great since he can up his iron by sucking on a nice piece of steak or porkchop. And it's also nice because it means when we eat out, like when we were in Palm Desert last weekend, I can simply cut him a slice of my food and he can just go to town.
Eating out is ever so easy when you can just feed your offspring from your plate.
So far we have really enjoyed this approach to the introduction of solids. Mealtimes are fun, easy, and pretty laid back once we get Mr. Impatient his tray of food. It's fun to watch him explore and play. To see his reaction to new foods as well as when he chooses from his favorites. It's also been a really great experience to see him develop - even though we've only been doing this a short time. He's already figured out which things will need two hands to pick up and which he can grab with one. He's figured out which foods are good for sucking on, and which are nice to chomp with his gums. And frankly, it's just about the cutest mess you can watch your kid get into.


